Menu Holder Size and Insert Format Guide
Menu holder sizing connects menu holder inserts with readable display fit, so the printed menu can sit inside the holder and remain clear to the reader. The main decision variables are menu holder size, insert format, page format, sleeve size, orientation, and holder capacity.
Restaurants compare A4, A5, Letter, 4 x 6, portrait, landscape, and multi view formats because menu content can vary by dining menu, drinks menu, specials card, or compact table display. A larger printed insert may support more menu detail, while a smaller menu card may reduce table footprint. The suitable format depends on the printed menu layout, table distance, and how much visible area the holder leaves open.
The right menu holder size depends on the printed menu layout and holder clearance, not only the paper label. Paper size, usable sleeve space, and visible display area should be checked separately because a printed insert can physically fit while still presenting the menu poorly. This distinction helps frame later decisions about insert compatibility, readability, and presentation.
Use the opening size decision as a criteria-based check before comparing examples later in the page. A suitable page format should match the menu type, the orientation should support portrait or landscape reading, and the page views should reflect the holder capacity needed for clear presentation.
- Match menu holder size to the printed menu and insert sleeve.
- Check insert fit against sleeve size, not only the named paper format.
- Compare visible area with the menu content that needs to remain readable.
- Choose portrait or landscape according to the printed menu layout.
- Use page views to decide whether a single view or multi view format is more suitable.
How Menu Holder Size Controls Fit and Visibility
Menu holder size controls both paper fit and readable display area. A printed insert may fit securely inside a menu holder, but readability can still depend on how much visible area remains exposed after insertion. The relationship between fit and presentation is influenced by sleeve dimensions, insert exposure, and holder design.
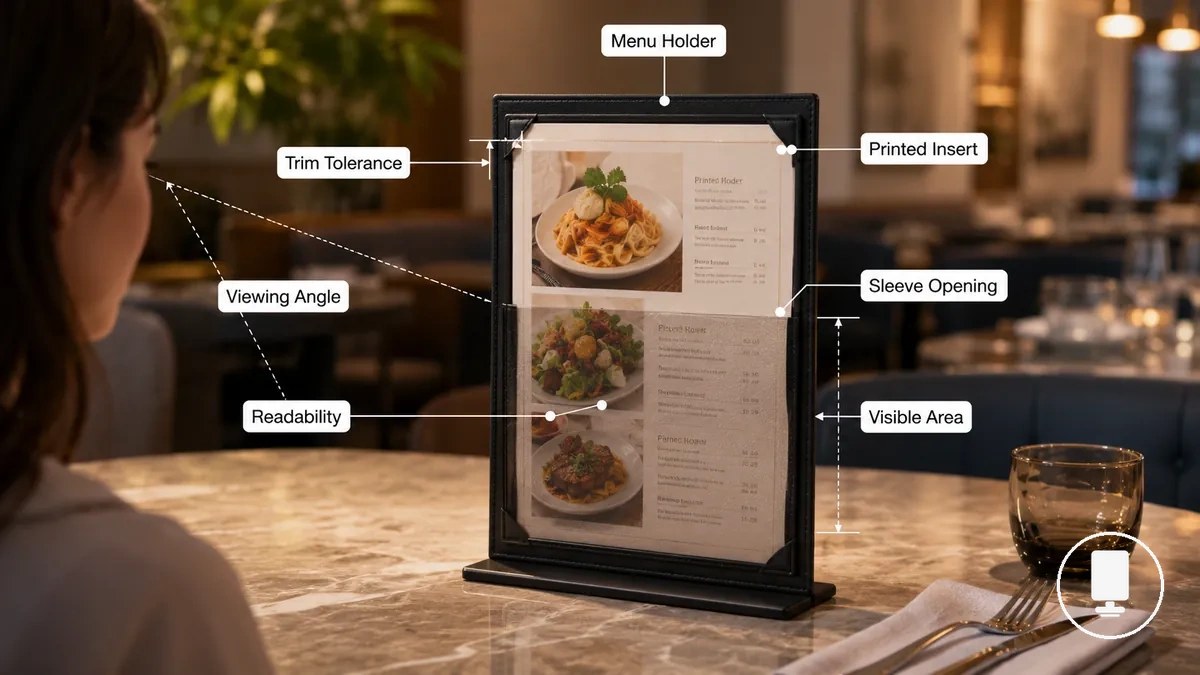
A sleeve opening is the space that accepts the printed insert, while the visible area is the portion that remains viewable once the insert is in place. Trim tolerance refers to the allowance between the printed insert and the sleeve opening that can influence insertion ease and fit. A larger visible area may support readability, while a smaller readable area can reduce display clarity even when the paper fits correctly. These sizing attributes complement a broader understanding of what menu holders are.
When customers read a menu from a table distance, viewing angle and insert exposure can affect how clearly content is presented. A menu holder can accommodate a printed insert physically, yet the visible area may still limit readability if too much content is covered by the frame border. Physical fit concerns whether the insert sits properly within the holder, while visibility concerns how easily the menu can be read.
How Menu Holder Size Controls Fit and Visibility can be reviewed through a few attributes that connect holder dimensions to practical display outcomes.
- Sleeve opening affects whether the printed insert can enter and sit correctly within the holder.
- Visible area influences how much menu content remains exposed to the customer view.
- Trim tolerance can affect insertion ease and the overall fit outcome.
- Viewing distance influences readability when a menu is read from across a table.
- Holder angle can affect visibility by changing the viewing angle of the displayed menu.
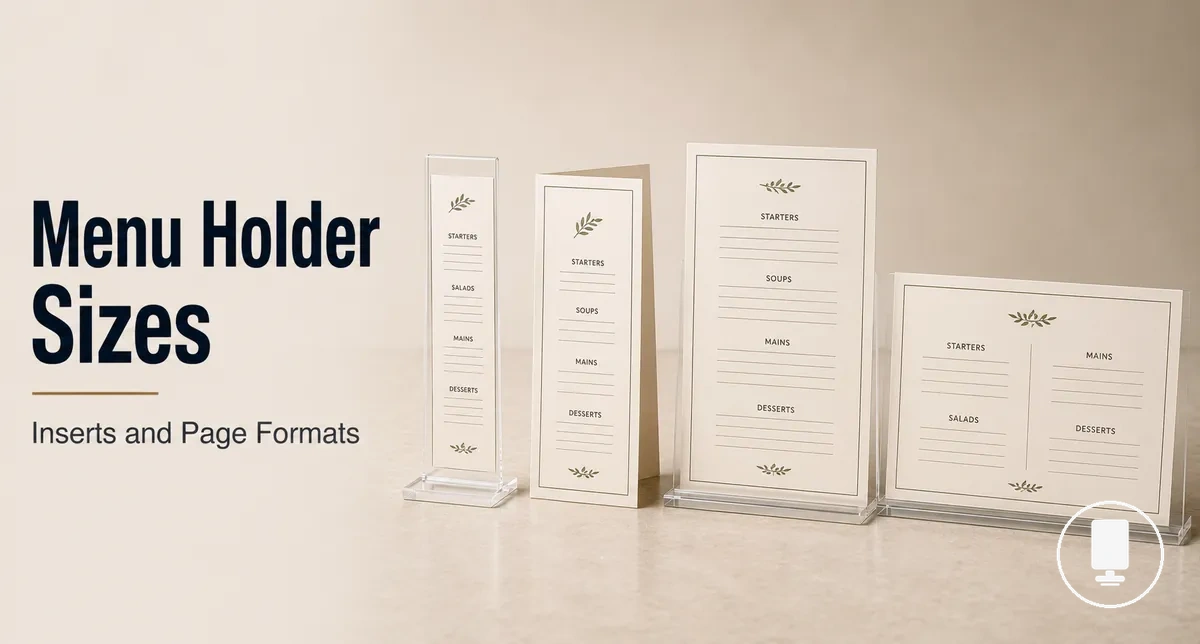
Standard Menu Holder Insert Sizes
Standard insert sizes are useful starting points, but they should be checked against the holder sleeve size before selecting a printed insert. A menu holder may accommodate a common paper size while still varying in visible area and insert clearance. Nominal paper size alone should not be used to determine compatibility.
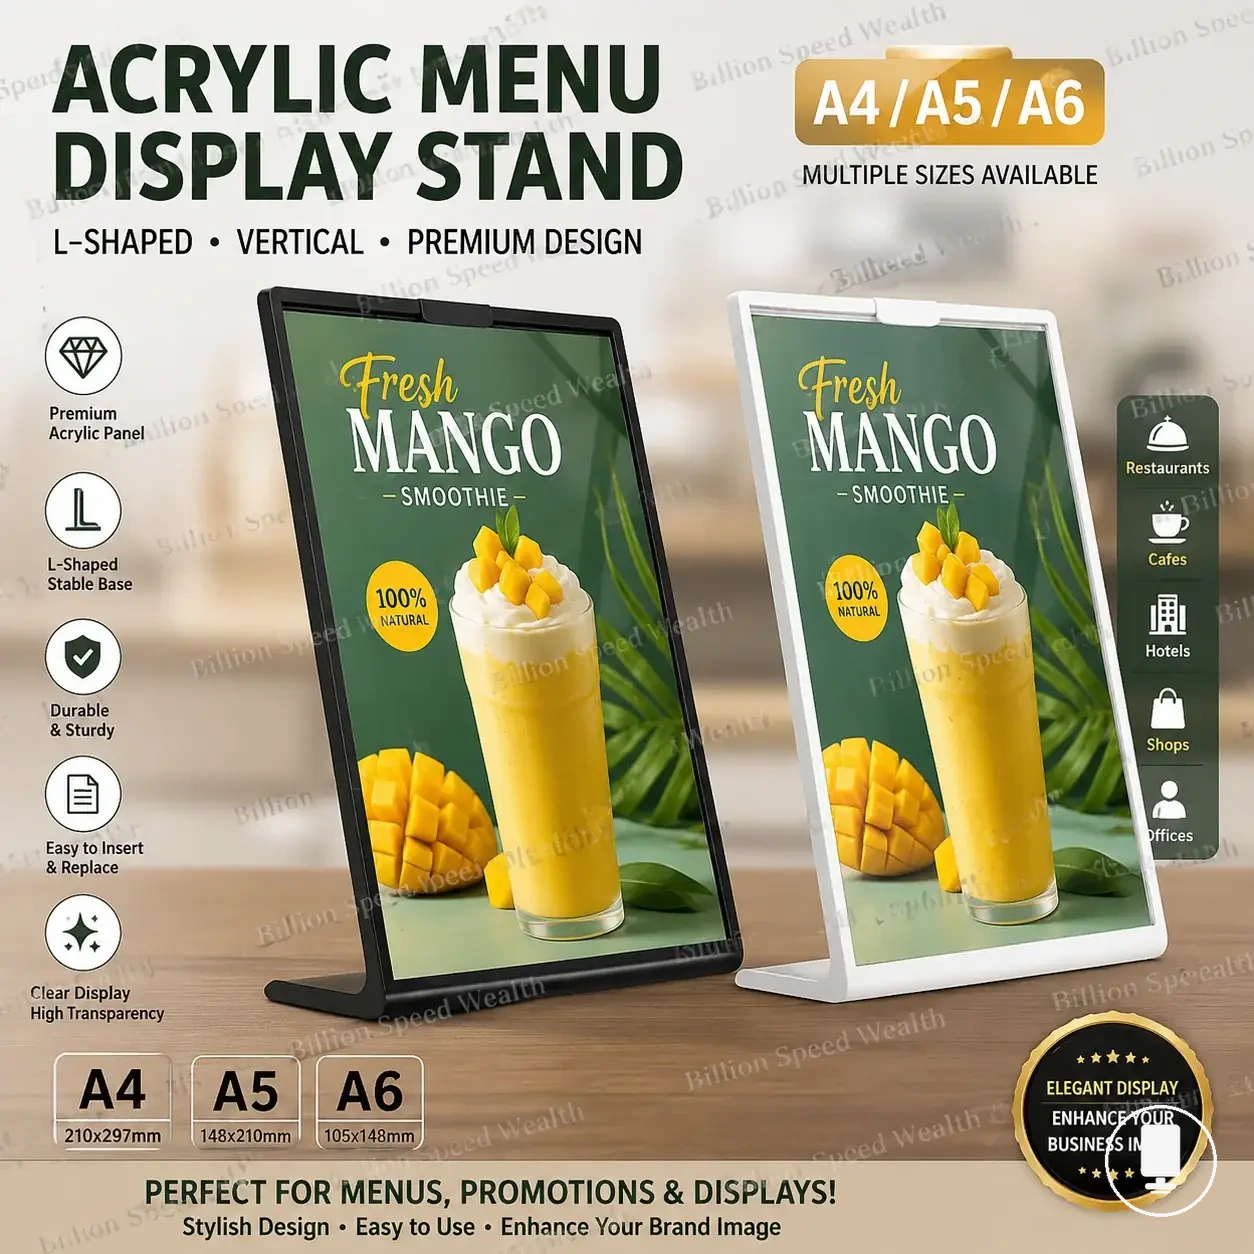
Common size families organize inserts by familiar paper names and display formats. A4, Letter, and Legal are often associated with full-page insert layouts, while A5, Half Letter, 4 x 6, and narrow inserts are commonly used for more compact displays. The table below compares standard insert sizes by typical menu use and fit caution.
| Paper Name | Typical Menu Use | Fit Caution |
|---|---|---|
| A4 | Full menu page | Check sleeve size, visible area, and printing tolerance |
| Letter | Full menu page | Confirm insert dimension against holder opening |
| Legal | Extended menu layout | Verify usable display space and sleeve size |
| A5 | Compact display | Review visible area before printing |
| Half Letter | Menu card size | Allow for printing tolerance and holder clearance |
| 4 x 6 | Specials or counter display | Check visible area after insertion |
| Narrow Inserts | Drinks or feature lists | Confirm width and readable area |
When restaurants print different menu types, insert size selection often depends on presentation needs and available display space. Larger formats may suit full dining menus, while compact formats can work for specials, desserts, drinks, or counter displays. The final choice depends on sleeve size, visible area, and menu content.
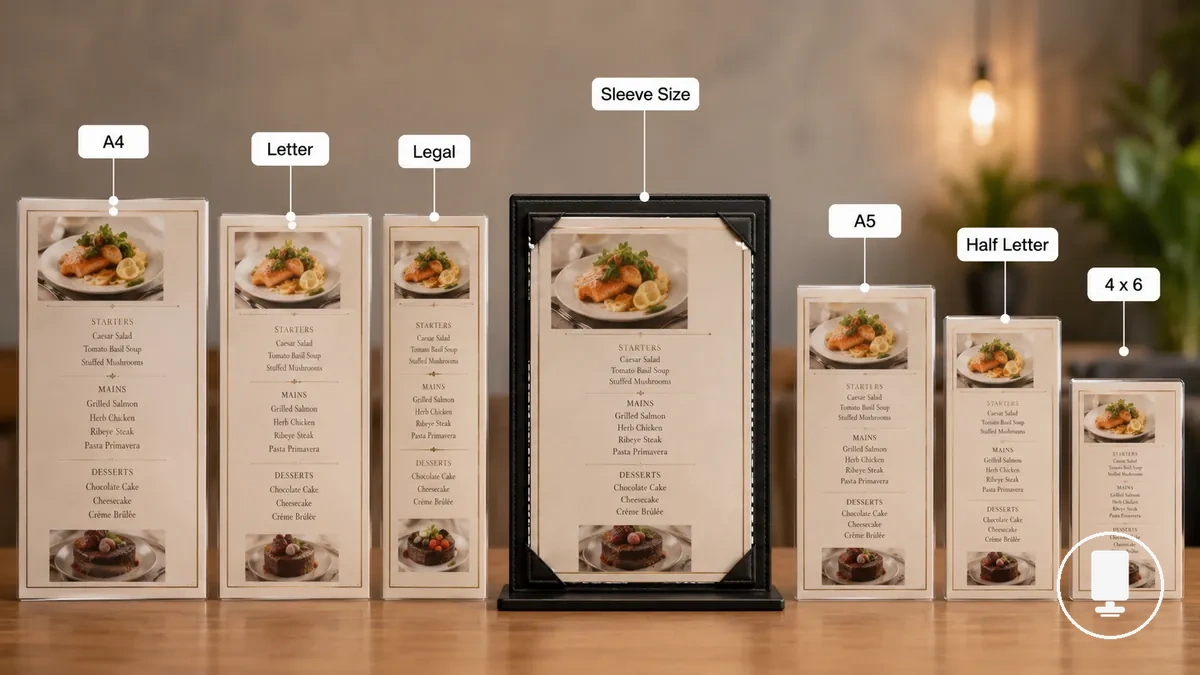
A4, Letter, and Legal Inserts for Full Menu Pages
Larger inserts suit a full menu page when the holder supports the correct sleeve size and sleeve clearance for that format. A4, 8.5 x 11 Letter, and Legal inserts can accommodate more menu content, but readability still depends on menu density, visible area, and viewing distance. Fit depends on holder dimensions rather than paper name alone.

When a restaurant uses full dining menus or detailed menu pages, a larger insert can provide additional space for content while maintaining page protection inside the holder sleeve. A4, 8.5 x 11 Letter, and Legal formats differ by regional paper naming, paper height, and available visible area. The comparison below highlights local sizing considerations and holder clearance differences.
| Insert Format | Local Sizing Consideration |
|---|---|
| A4 | Often used for a full menu page; check sleeve clearance and visible area. |
| 8.5 x 11 Letter | Common full-page insert format; fit depends on holder sleeve dimensions. |
| Legal | Tall insert format that may require additional sleeve clearance and page protection space. |
A5, Half Letter, 4 x 6, and Narrow Inserts for Compact Menus
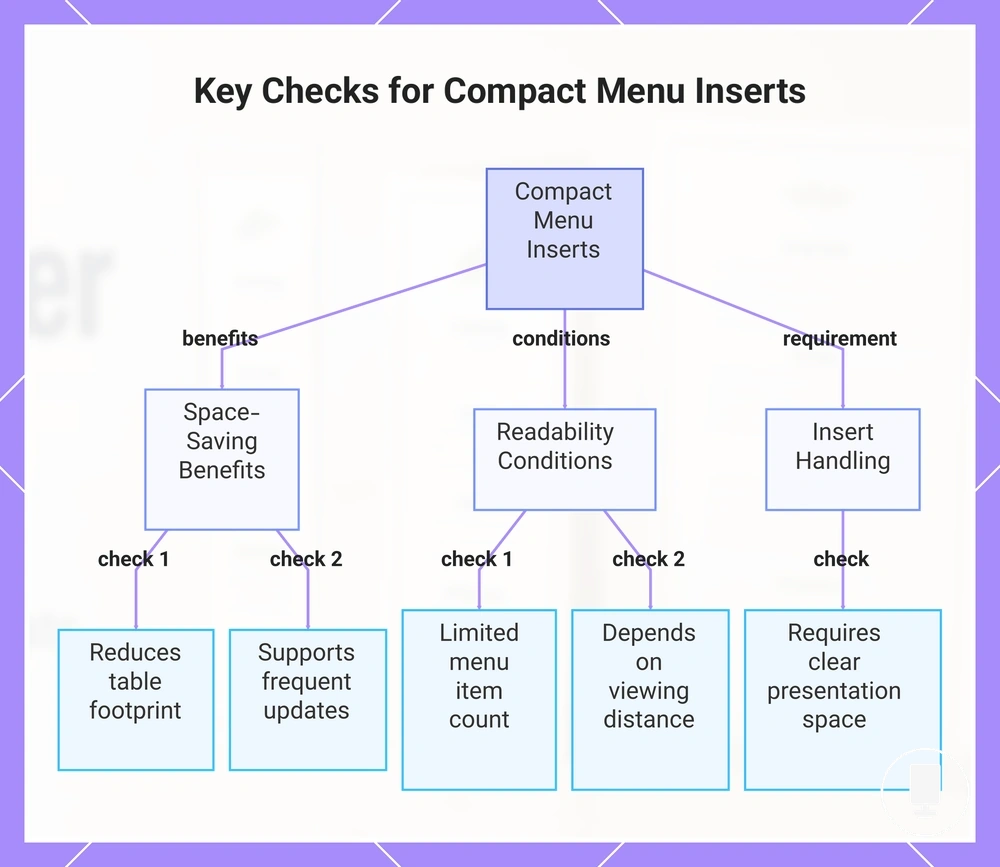
Compact inserts fit shorter menus or promotional content when readability remains adequate for the intended visibility distance. A5, Half Letter, 4 x 6, and narrow inserts can support a compact menu while reducing table footprint. Suitability depends on menu item count, content density, and viewing conditions.
When a specials card, drinks menu, dessert menu, or counter card needs frequent updates, a compact insert can provide a smaller display format with easier placement. These formats often trade menu space for a reduced table footprint, so readability may depend on visibility distance and update frequency. The following checks highlight the main space-saving and readability conditions.
- Content Length: A compact insert is usually more suitable when menu item count remains limited.
- Visibility Distance: Readability may depend on how far the menu card is viewed.
- Table Footprint: A5, Half Letter, 4 x 6, and narrow inserts can reduce occupied table space.
- Update Frequency: Specials cards and promo inserts may be useful when content changes regularly.
- Insert Handling: A smaller insert should still provide enough space for clear presentation and reading.
This chart shows the main space-saving benefits and readability conditions for using compact menu inserts like A5, Half Letter, 4x6, and narrow formats.
Insert Fit, Sleeve Size, and Holder Clearance
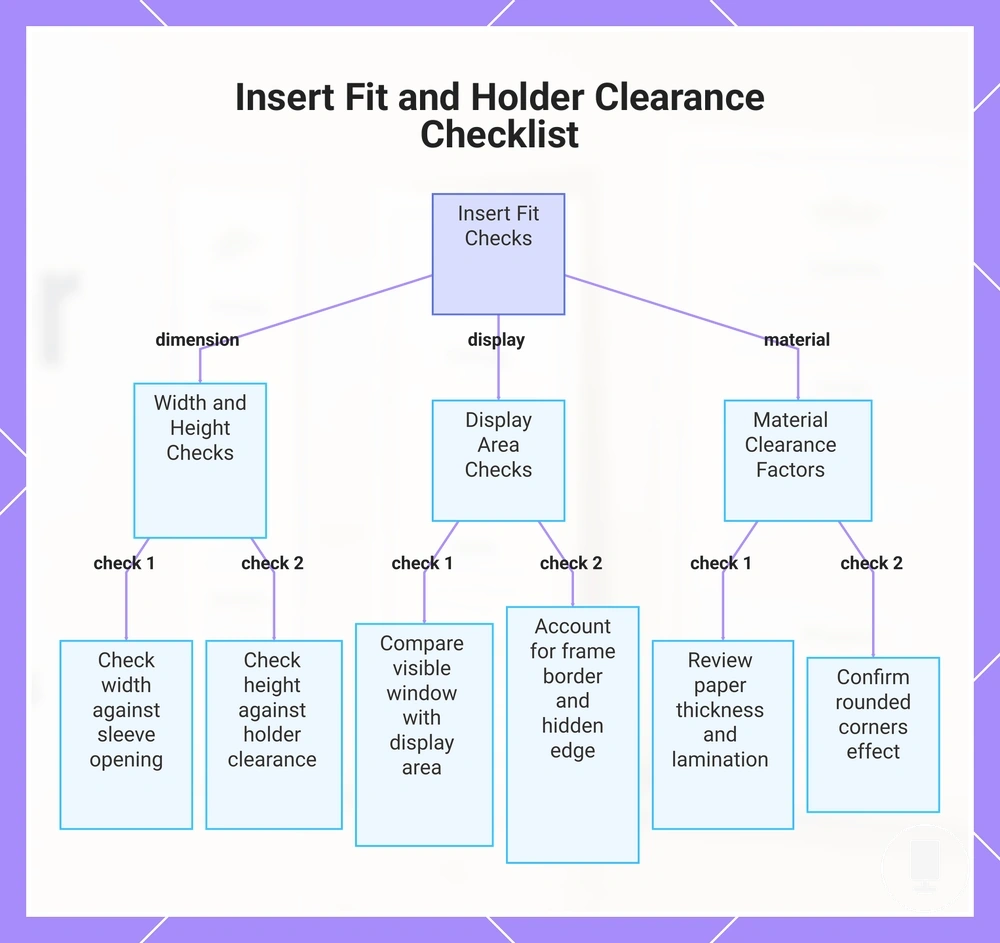
Insert fit depends on usable sleeve dimensions and holder clearance rather than the printed paper label alone. Insert compatibility is determined by the available insert width, insert height, and usable space inside the holder sleeve. A printed paper label should be treated as a reference point rather than a fit confirmation.
A sleeve opening is the entry space that accepts the insert, while the visible window is the portion that remains viewable after placement. The frame border can cover part of the insert edge, which affects the visible panel and overall display area. Insert width and insert height should be checked against usable space inside the holder sleeve rather than outside dimensions. Material construction can influence clearance, but detailed material comparisons belong outside this sizing-focused section.
When paper thickness, lamination, or rounded corners change, holder clearance may also change. A thicker paper stock or laminated insert can affect insert compatibility even when printed dimensions remain similar. For related display configurations, see menu holder formats. The checklist below helps organize the main fit checks before printing or ordering inserts.
- Check insert width against the sleeve opening and available usable space.
- Check insert height against the holder sleeve and clearance space.
- Compare the visible window with the intended display area.
- Account for the frame border and any hidden edge around the insert.
- Review paper thickness and lamination as potential clearance factors.
- Confirm whether rounded corners affect insertion or holder clearance.
This chart shows the main fit checks to verify before printing or ordering inserts, covering dimensions, display area, and material factors.
Page Views and Menu Holder Capacity
Page views refer to the customer-facing menu panels that can be seen during use, while holder capacity reflects how much information is available through those visible panels. Physical inserts contribute to displayed capacity, but holder capacity is measured through visible panels and display faces rather than insert count alone. This distinction separates physical inserts from customer-facing page views.
When a holder uses a single view, customers typically scan one visible panel at a time. A two view or double-sided arrangement can increase the number of display faces available for viewing without necessarily increasing the number of physical inserts. Displayed capacity therefore depends on how viewing faces are presented and accessed.
More views can help when menu categories need to be distributed across additional visible panels while keeping reader effort manageable. Three page, four view, and multi view arrangements can expand customer-facing capacity, but the effect depends on how information is organized across display faces. The comparison below highlights the difference between physical page count and visible menu panels and relates to single page versus multi page menu holders.
| Capacity Attribute | Customer-Facing Effect |
|---|---|
| Physical Inserts | Represents insert count inside the holder |
| Single View | One visible panel available for scanning |
| Two View | Two visible panels presented at the same time |
| Double-Sided | Display faces available on both sides of an insert |
| Three Page / Four View | Additional visible panels that may increase displayed capacity |
| Multi View | More menu panels available with increased reader effort |
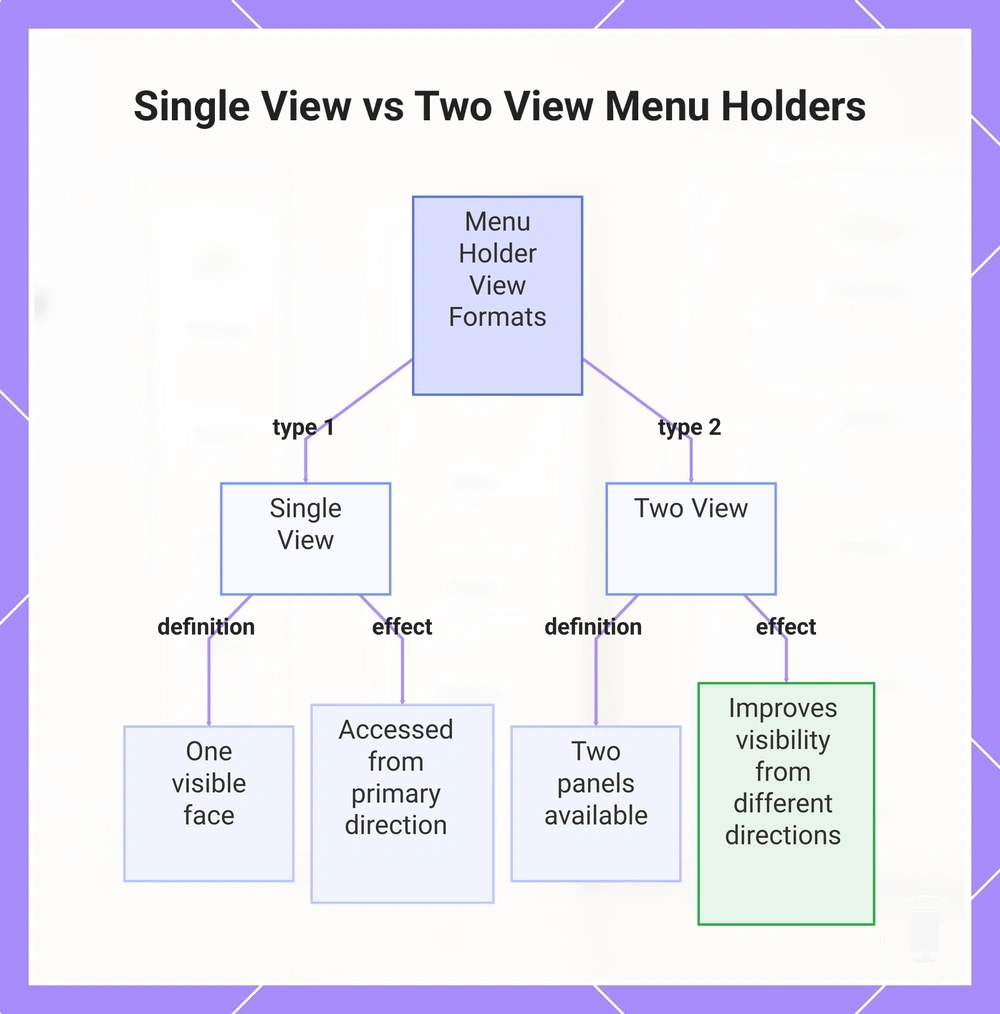
Single View and Two View Menu Holders
Single view and two view formats differ by how many visible faces are available to the customer at one time. A single view uses a one-sided display with one visible face, while a two view format presents two panels through a double-sided display. Customer visibility may vary with table position and table approach direction.
When customers approach a table from different sides, the first visible face may change. A double-sided display can provide an additional insert side for viewing from another direction, while a one-sided display presents a single viewing face. The examples below highlight the local difference in menu scanning.
View count affects how customers access menu information during scanning.
- Single View: One visible face is presented through a one-sided display, so customers typically access one panel from the primary viewing direction.
- Two View: Two panels are available through a double-sided display, which may improve customer visibility when table approach direction differs.
This chart compares single view and two view menu holder formats, showing their definitions and how they affect customer visibility based on table approach direction.
Three Page, Four View, and Multi View Menu Holders
Three page, four view, and multi view formats increase visible menu space by adding more visible panels, but they can also increase handling effort during printing, insertion, and scanning. A multi view holder can organize more menu categories within one holder through additional panels. This format may be useful when more content needs to be displayed in an organized sequence.
When food, drinks, specials, or desserts are separated into distinct menu categories, extra views can distribute content across multiple visible panels. As the insert sequence becomes more detailed, page order and scanning may require greater attention to maintain display clarity. The table below highlights the local tradeoff between display space and handling effort.
Multi view formats organize more menu content inside one holder while introducing additional handling considerations.
| Format | Display Space and Handling Effort |
|---|---|
| Three Page | Provides additional visible panels while requiring a more structured insert sequence. |
| Four View | Expands display space across more visible panels but may increase scanning effort. |
| Multi View | Supports more menu categories within one holder, though handling effort can increase as additional panels are added. |
Portrait and Landscape Orientation for Printed Menus
Portrait and landscape orientation depend on matching the printed menu layout with the holder support direction. A portrait holder typically aligns with a vertical format, while a landscape holder aligns with a horizontal format when the printed design follows the same reading flow. Orientation should be checked against both the printed menu layout and the holder’s physical support direction because rotation limits may vary.
Portrait orientation emphasizes menu height and vertical content flow, while landscape orientation emphasizes menu width and horizontal content distribution. These display orientation differences can influence line length, customer scanning, and how content is arranged within the visible area. They can also affect table space and overall menu footprint.
When menus are presented on tables or counters, display orientation can influence how content is viewed from the available position. Landscape formats may support broader counter visibility, while portrait formats may use table space differently because of menu height and width. The comparison below summarizes key compatibility attributes and can support decisions about using menu holders clearly.
| Orientation | Compatibility Attribute |
|---|---|
| Portrait | Emphasizes menu height, supports vertical reading flow, and may affect table space differently. |
| Landscape | Emphasizes menu width, supports longer line length, and may improve counter visibility. |
| Holder Support | Should align with the printed design and physical support direction. |
| Rotation Limits | May influence whether an insert can be displayed in an alternative orientation. |
Matching Menu Holder Size to Menu Type
Menu type determines the safest size range, holder size, and view count for clear menu presentation. A full food menu may require more page capacity than a specials card, while a compact menu format may prioritize a smaller footprint. The selection should be based on visibility need, capacity need, and fit caution.
When full food menus, drinks menus, specials, dessert cards, table tents, and counter menus use different content lengths, their sizing requirements can also differ. Full food menu layouts may align with A4 or similar formats, while drinks menus often suit A5 or other compact display formats. Specials and dessert cards can use 4 x 6 formats when content remains concise or changes frequently. The table below organizes these decision variables by menu type.
| Menu Type | Suitable Size Range | Visibility Need | Capacity Need | Fit Caution |
|---|---|---|---|---|
| Full Food Menu | A4 or similar full-page format | Higher visibility need | Higher page capacity | Check holder size, orientation, and view count |
| Drinks Menu | A5 or compact display format | Moderate visibility need | Moderate capacity need | Balance readability with table footprint |
| Specials | 4 x 6 or compact format | Focused visibility | Lower capacity need | Confirm readability for updated content |
| Dessert Card | 4 x 6 or compact holder | Focused visibility | Lower capacity need | Check usable display space after insertion |
| Counter Menu | Depends on display need | Counter visibility priority | Varies by content length | Match orientation to viewing position |
| Table Tent | Compact display format | Short-range visibility | Limited capacity need | Check panel visibility from multiple sides |
| Single View | Depends on menu layout | One visible panel | Lower page capacity | Review content length before selection |
| Multi View | Depends on menu layout | Multiple visible panels | Higher page capacity | Review page sequence and handling effort |
The table highlights decision signals rather than fixed rules. A larger size range may be the safer choice when menu content length, visibility need, or capacity need increases, while a smaller footprint may suit concise content. Extra page views can help when a single view format does not provide enough display space.
Menu holder size selection depends on matching menu type, orientation, suitable size range, and view count to the intended display need. A final review of visibility need, capacity need, and fit caution can help confirm whether a compact holder, single view, or multi view format is more appropriate. Additional selection criteria can be reviewed through the menu holder selection checklist before making a final decision.
Here are product examples that may make comparison easier. Before buying, always review the compatibility criteria, essential features, and product details.


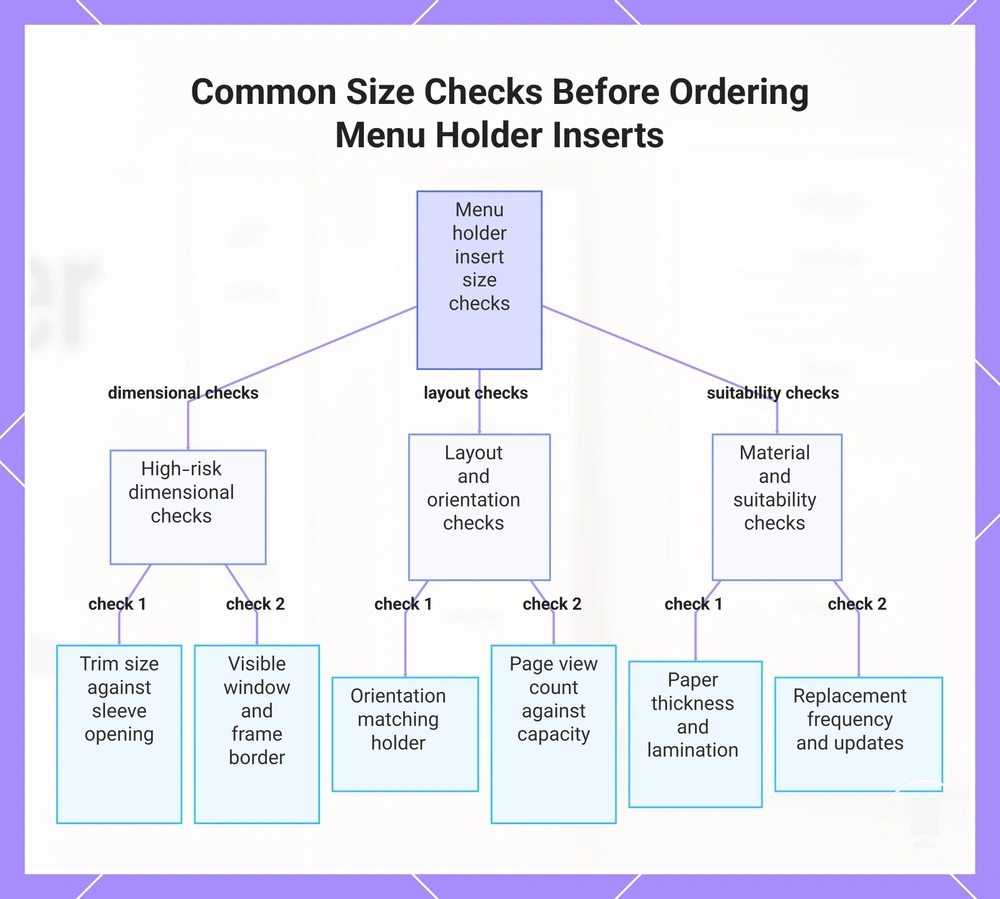
Common Size Checks Before Ordering Menu Holder Inserts
Size checks for menu holder inserts should compare printed paper size, trim size, sleeve opening, visible window, and orientation before printing or ordering. These checks can reduce the risk of insert-size mismatch and hidden content after insertion. A safe fit verification usually depends on reviewing all sizing conditions together.
Mismatch issues often occur when a printed insert is measured differently from the usable display area inside the holder. Differences between trim size and sleeve opening, hidden space behind a frame border, or an incorrect orientation can affect visibility. Page view count, paper thickness, and menu update needs may also influence insert suitability. The checklist below organizes the most practical ordering checks.
- Confirm the printed paper size matches the intended menu layout.
- Verify the trim size against the sleeve opening rather than relying on the paper label alone.
- Check the visible window to identify whether part of the printed design may be hidden.
- Match orientation to the holder layout and intended reading direction.
- Review page view count against holder capacity and menu layout.
- Consider paper thickness when sleeve clearance appears limited.
- Check whether lamination may affect insertion space or handling.
- Review replacement frequency and menu update needs before finalizing a printed insert order.
- Confirm that a frame border does not cover important text, images, or menu sections.
The highest-risk size checks usually involve trim size, sleeve opening, and visible window dimensions. A printed insert may match the intended paper format while still displaying differently after insertion. Orientation and page view count should also be reviewed when menu layouts use multiple visible panels.
Edge cases can occur when lamination adds thickness, when a tight sleeve leaves limited clearance, or when holder borders hide part of the printed design. These conditions may affect readability and insertion ease even when the printed paper size appears suitable. Reviewing these risks before printing can support more reliable fit verification.
The final check sequence is to confirm printed paper size, verify display visibility, review holder capacity, and evaluate any clearance-related conditions. For broader context around menu holders, completing the insert checklist can improve decision readiness.
Here are product examples that may make comparison easier. Before buying, always review the compatibility criteria, essential features, and product details.
This chart shows the most important size checks to perform before ordering menu holder inserts, grouped by dimensional, layout, and suitability factors.