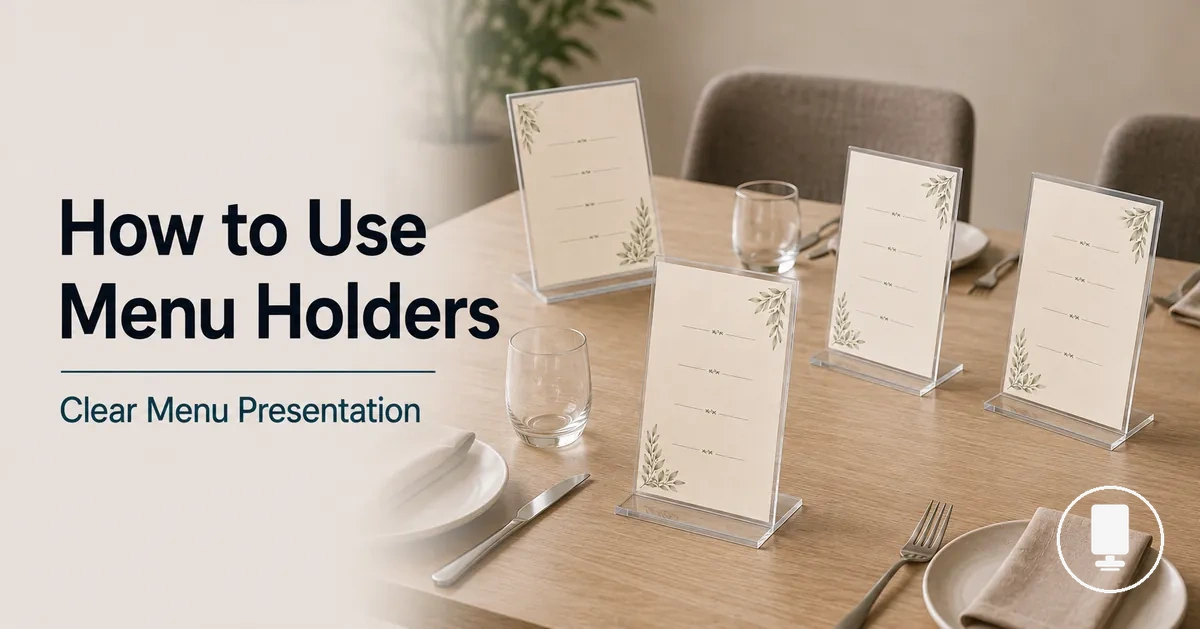
Using Menu Holders for Clear Table Presentation
Menu holders are table display tools that hold a printed menu insert so guests can read menu information without handling loose pages. A clear holder, double-sided holder, or simple table menu holder supports the same goal when the insert, viewing angle, and surface condition keep the menu easy to see. Correct use starts with clear table presentation.
When a menu holder is clean, stable, and matched to the menu insert, visibility can improve because the readable menu stays upright and easier to scan. Poor fit, glare, crowded table placement, or a worn holder can make the same menu harder to read. A specials display also needs current insert handling so temporary offer details do not look outdated or unclear. The setup should therefore start with the holder condition, insert fit, and customer viewing direction.
Practical use connects the menu insert, table placement, and upkeep as one display system. The insert should fit the holder opening without hiding text, the holder should face the likely reading direction, and the surface should stay clear enough to avoid unnecessary glare or blocked content. A double-sided holder may need front content and back content arranged for a two-view display, while a temporary specials display may need easier insert changes. Type, size, placement, maintenance, and problem details matter here only when they support correct use rather than a buying comparison.
Menu holder setup basics before display
Menu holder setup is the basic preparation that helps a display present a readable menu before any menu insert is shown. Clear presentation depends on stability, a clear surface, insert access, and viewing direction. The holder position should support visibility without blocking table use. Table space and menu placement should work together before the display is used.
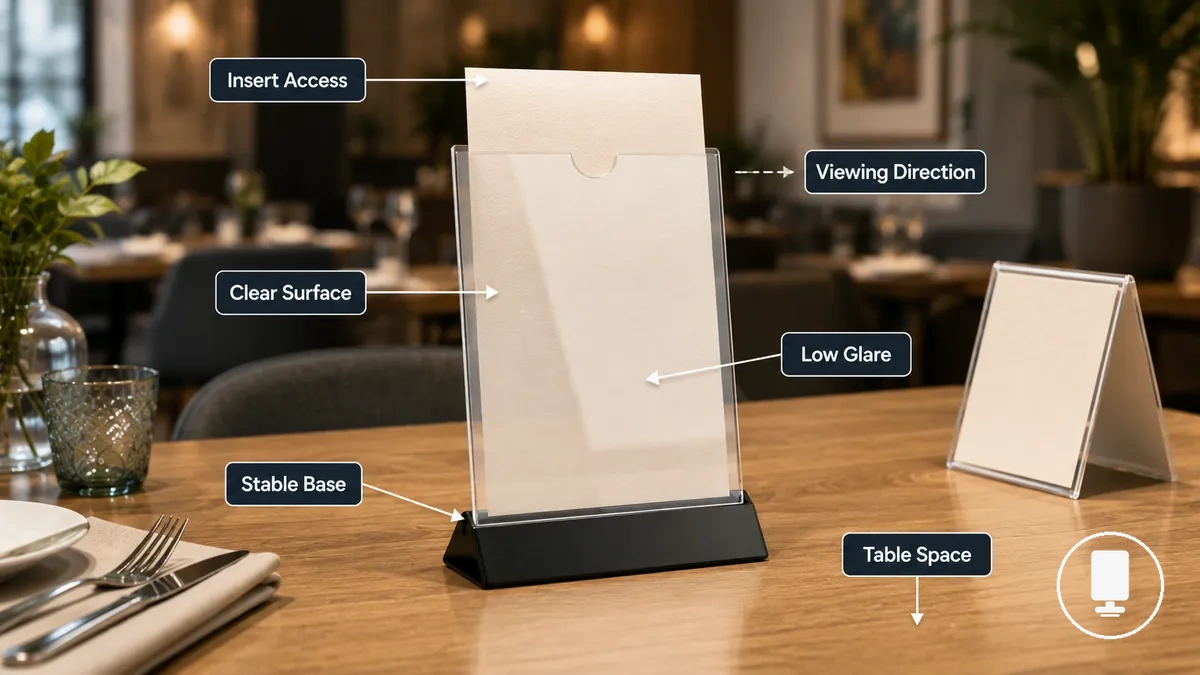
Stability helps keep the display in a consistent position, while a clear surface can reduce distractions that affect readability. Insert access depends on the slot direction and available space for placing or changing a menu insert. The customer viewing angle should align with the table position so content remains easier to read. For broader context about menu holders, these setup checks focus only on display readiness before use.
A table tent, clear stand, or menu display stand may follow the same setup principles when visibility, access, and positioning are considered before display. These checks support correct setup, while wider discussions about menu holder uses belong outside this setup overview.
The following checklist can help verify that the setup is ready before a menu is displayed.
- Check that the base is stable on the table surface.
- Check that the clear surface is free from fingerprints or marks that may affect readability.
- Check that the insert path is open and the menu insert can be positioned without obstruction.
- Check that the viewing direction matches the expected customer angle.
- Check that enough table space remains around the display.
- Check that glare is limited so visibility remains clear.
Preparing menu inserts for readable presentation
Readable presentation starts before insertion by preparing menu inserts to match the holder opening and viewing conditions. A menu insert that is trimmed correctly and positioned clearly can support visibility and reduce distractions. Preparation should focus on fit, orientation, and readability before the insert is placed in the holder.
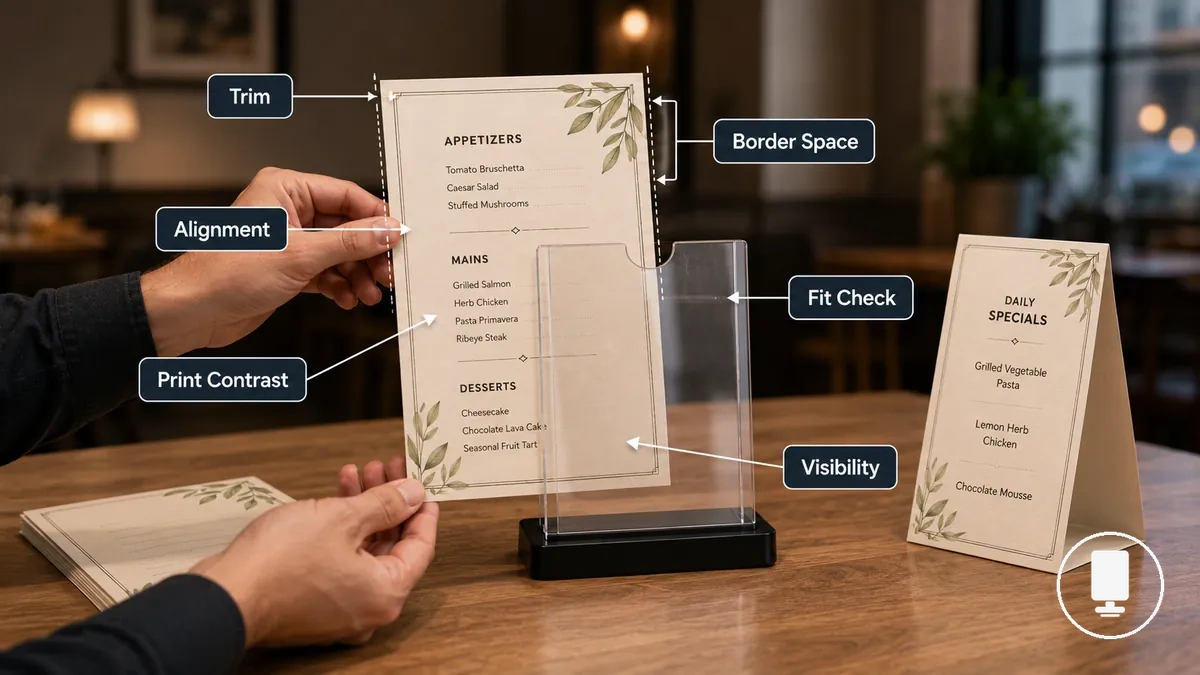
Trim, alignment, and visibility checks help ensure that printed menus remain easy to read once displayed. Border spacing should remain visible around important content, and print contrast should make text easier to distinguish. Before insertion, complete the following steps to check fit condition and presentation quality.
- Trim menu inserts so the edges fit the holder opening without covering content.
- Check orientation and confirm that portrait or landscape layouts match the holder slot.
- Align text and graphics so border spacing remains visible around the menu page.
- Review print contrast to make sure important information remains easy to distinguish.
- Perform a visibility check by viewing the insert through the holder from a normal reading angle.
- Insert the menu and confirm that the sheet stays flat and readable.
Paper thickness and fit condition can affect how menu inserts sit inside a holder. If an insert is too loose, slipping risk may increase and content can shift out of position. If an insert is too rigid or crowded inside the holder, bending risk may increase and parts of the menu may become harder to view. A final visibility check can help identify hidden text, uneven alignment, or display issues before use.
Folded specials, single-page menus, and portrait inserts can follow the same preparation method by checking trim, alignment, and readability before display. For detailed sizing considerations, see menu holder insert sizes rather than treating every format as a separate preparation process.
Matching insert size and orientation to the holder
Matching insert size and orientation to the holder depends on how the menu insert fits the holder opening. Insert size should be checked against both width and height. Orientation should match whether the holder displays content in portrait or landscape format.
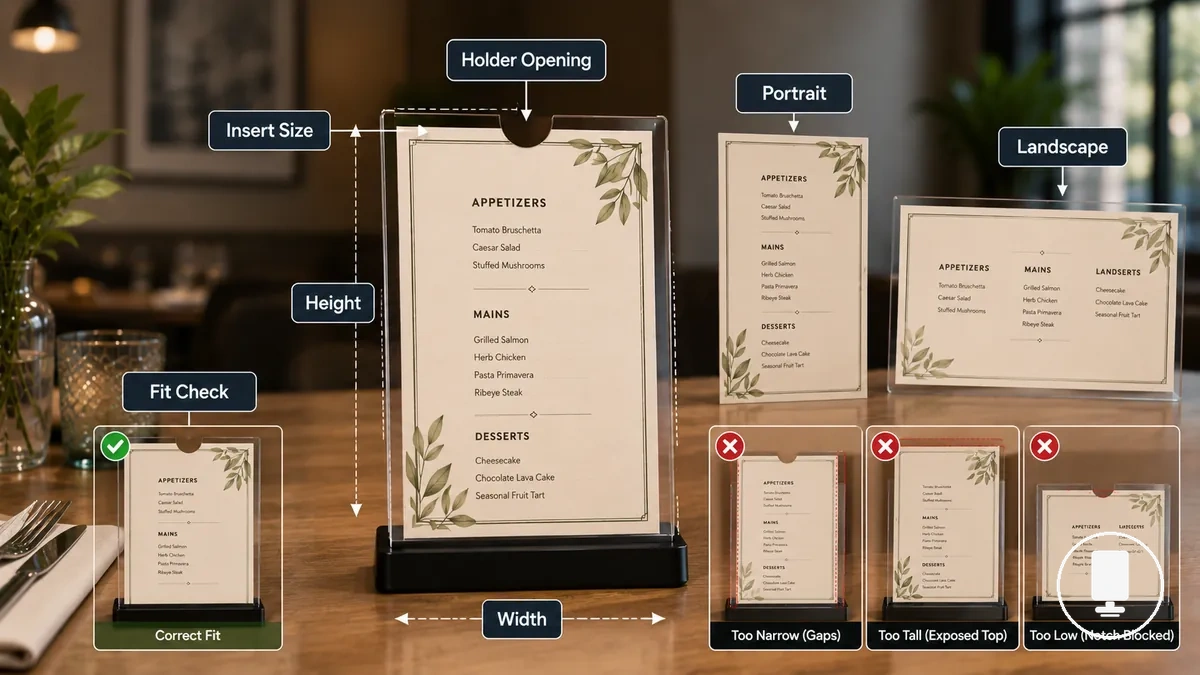
Width and height influence how the menu insert sits within the holder opening. The opening direction and sleeve layout can affect whether a portrait or landscape insert is positioned correctly. A fit check that considers size and orientation together can help reduce exposed edges, bending, blocked content, and visibility issues.
- Size fit: An insert size that matches the holder opening can support a cleaner display with fewer exposed edges.
- Width and height: An oversized insert may increase bending risk, while a smaller insert may leave exposed edges.
- Orientation fit: A portrait or landscape layout should align with the holder opening and viewing direction.
- Opening direction: The sleeve or slot direction can influence how easily the menu insert is positioned and viewed.
- Fit check: Checking for blocked content, slipping, or uneven placement can help confirm a readable menu before display.
For broader format guidance, see menu holder insert sizes, while keeping this local fit check focused on matching insert size and orientation before placement.
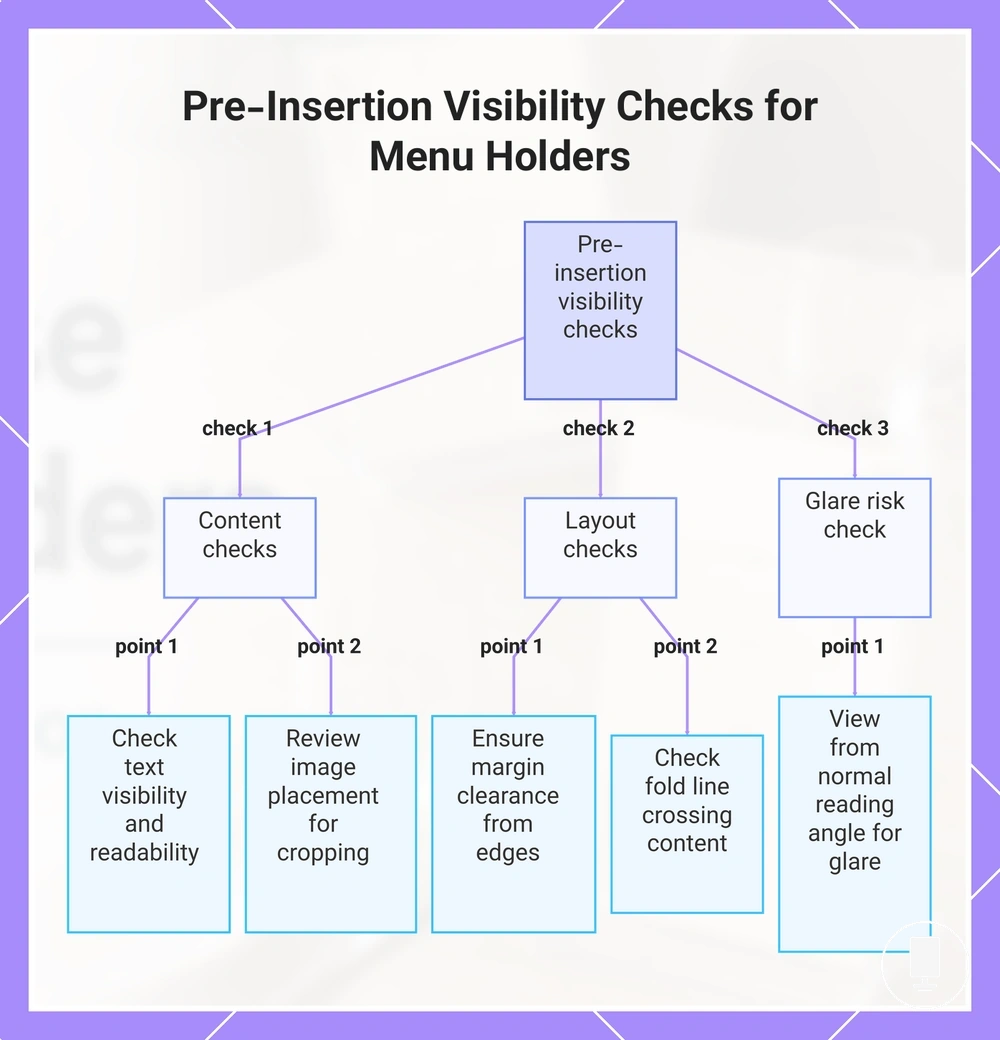
Keeping menu text and images visible before insertion
Visibility should be checked before insertion so menu text and menu images remain visible inside the holder. Printed content should stay within the visible area and away from edges that may block information. A quick review of text position, margins, and image placement can help avoid hidden or distorted presentation.
Holder edges, clear panels, and fold lines can affect how menu content appears after insertion. If menu text sits too close to an edge, readability may decrease when part of the content falls outside the visible area. Menu images may appear cropped, and glare risk can increase depending on the panel material, insert position, and viewing angle. Use the following visibility checks before placing the insert into the holder.
- Menu text: Check text position, font size, and contrast so important content remains visible and readable.
- Menu images: Review image placement to reduce the chance of image cropping near a holder edge.
- Margin clearance: Leave enough margin clearance so content is less likely to be blocked by holder borders or panels.
- Fold line: Check whether a fold line crosses text or graphics that could become harder to read after insertion.
- Glare risk: View the insert from a normal reading angle to identify reflections that may reduce visibility.
This chart shows the key visibility checks to perform before inserting menu content into a holder, including content, layout, and glare checks.
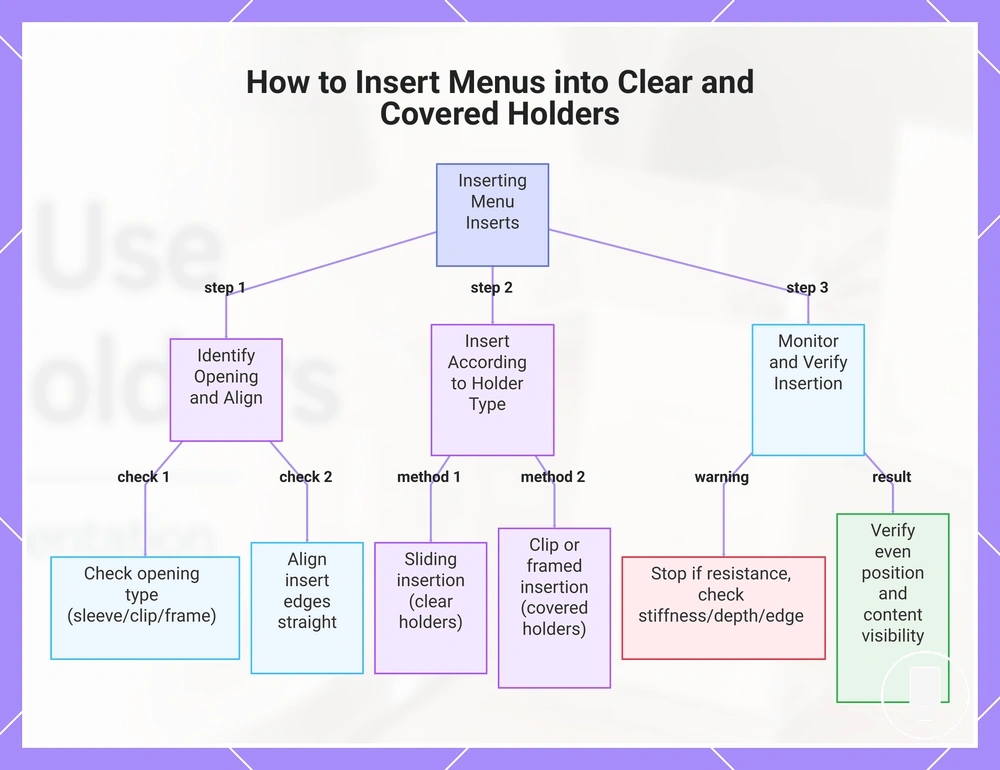
Inserting menus into clear and covered holders
Inserting menus depends on the holder opening, sleeve depth, and insert stiffness. A menu insert that moves smoothly in one holder may require a different approach in another holder. Checking alignment before insertion can help reduce bending and misalignment.
Clear holders often use a sliding insert method through an open edge or menu sleeve. Covered holders may use a covered sleeve, clip tension, or a framed holder design that changes how the insert enters the display area. Sliding insertion usually depends on sleeve depth and insert stiffness, while clipping or framed insertion depends more on frame edges and tension points. The appropriate method can vary by holder construction.
Use the following sequence to guide inserting menus into clear holders and covered holders. Each step focuses on alignment, movement, and visibility while avoiding unnecessary pressure points.
- Identify the holder opening and check whether the insert enters through a sleeve, clip, or frame edge. A clear entry path can support smooth insertion.
- Align the menu insert with the holder opening and check that the insert edges remain straight. Proper alignment can reduce the chance of misalignment during insertion.
- Slide, clip, or place the insert according to the holder type. If resistance increases unexpectedly, stop and check insert stiffness, sleeve depth, or edge position before continuing.
- Guide the insert gradually into the display area and watch for bending near corners or pressure points. Controlled movement can help maintain alignment during insertion.
- Check that the insert sits evenly within the holder and that important content remains visible. An even position can support a secure display and reduce visible misalignment.
Sliding insertion, clipping, and framed insertion serve the same purpose but may require different handling. If a holder uses clip tension or frame edges, excessive force may increase the risk of scratches, bending, or uneven placement. When pressure points become noticeable, stop and realign the insert before continuing.
This chart shows the step-by-step process for inserting menu inserts into clear and covered holders, including alignment checks, insertion methods, and handling resistance to avoid damage.
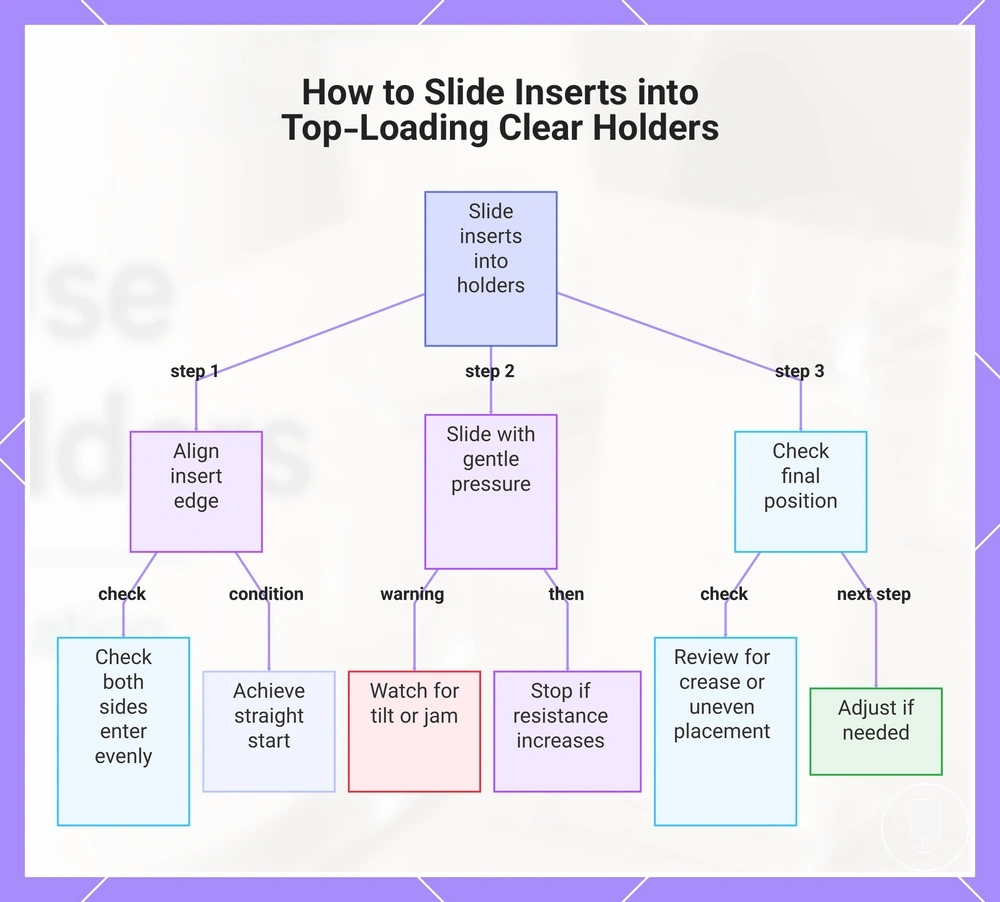
Sliding inserts into top-loading clear holders
Sliding inserts into a top-loading clear holder starts with alignment before gentle pressure is applied. The insert edge should line up with the top opening so the menu insert can slide into the clear sleeve with less risk of tilt, jamming, or a visible crease.
Use the following steps to guide the menu insert through the inner channel. Insert thickness and sleeve condition can affect resistance, so stop and adjust if the insert does not move smoothly. After insertion, check visibility and alignment before use.
- Align the insert edge with the top opening and check that both sides enter evenly. A straight start can support a smooth slide.
- Slide the menu insert into the inner channel using gentle pressure. Watch for tilt as the menu insert moves through the top-loading clear holder.
- Stop if a jam develops or resistance increases unexpectedly. Check alignment and adjust the insert edge before continuing.
- Check the final position and review the visible area for a visible crease, uneven placement, or shifted content. Adjust the menu insert if needed.
This chart shows the steps to safely slide a menu insert into a top-loading clear holder, including alignment, insertion, and final checks.
Securing inserts in corner, clip, and frame holders
Inserts should be secured at grip points without covering key details in the visible menu area. Corner holders, clip holders, and frame holders hold inserts differently, so secure placement depends on grip points, insert thickness, and pressure points. The goal is a secure display that reduces slipping, bending, or blocked details.
Corner tabs should grip insert corners without covering visible menu content. Menu clips may hold inserts more firmly, but clip tension and insert thickness can affect slipping or bending. Frame edges should hold the insert in alignment so the visible menu remains clear, followed by a final stability check.
- Corner holders: Check that corner tabs grip the insert corners without causing blocked details near the edges.
- Clip holders: Check that menu clips hold the insert without creating pressure points that may lead to bending.
- Frame holders: Check that frame edges secure the insert while keeping visible menu content unobstructed.
- Insert thickness: Check that insert thickness suits the holder mechanism so the insert is less likely to slip.
- Secure display: Check that the insert remains aligned, visible, and stable after placement.
Using double-sided holders for two-view display
Double-sided holders work best when both sides have clear viewing roles. A two-view display depends on front content and back content being paired appropriately and positioned according to table orientation and viewing direction.
Front-back pairing should help readers understand which information belongs on each side of the double-sided holder. Table orientation can influence readability because customers may approach the display from different seating positions or traffic directions. Front content and back content can complement each other when each side serves a distinct purpose. Clear separation between messages can help reduce menu confusion.
A practical example is placing a main menu on one side and specials on the other side of a double-sided display. This arrangement can help customers view different information from different directions without requiring additional table space. Distinct front content and back content may also reduce repeated content and lower the chance of a missed message.
| Front Content | Back Content |
|---|---|
| Main menu items | Specials or temporary offers |
| Core menu information | Supplementary menu details |
| Message for one viewing direction | Message for the opposite viewing direction |
Pairing front and back menu content clearly
Front content and back content should each have a clear reading purpose. A clear presentation depends on how each menu side is paired, how message priority is assigned, and how the content relates to viewing direction in a two-way display.
Message priority may vary by menu type, offer type, and table orientation. Front content and back content can complement each other when each side serves a distinct role. Duplication may be useful for essential information, but excessive duplication can reduce readability and contribute to customer confusion.
The following pairings can help clarify two-way content.
- Main items and specials: Pair main menu content on one side with specials on the reverse side to separate core choices from temporary offers.
- Drinks and desserts: Pair different menu categories to support a clear presentation without repeating the same information.
- Language variants: Pair equivalent content in different languages when customers may approach from different viewing directions.
- Primary information and supporting details: Pair higher message priority on one menu side with supplementary details on the other side to improve readability.
- Selective duplication: Duplicate only essential information when needed so the two-way display remains easier to follow.
Positioning table menu holders for easy reading
Positioning table menu holders for easy reading starts with choosing a placement point that protects both the sightline and service flow. A table menu holder should remain visible to customers without requiring them to move tableware, while still leaving enough space for dining activities and customer reach.
Easy reading depends on table size, viewing angle, height, lighting, and base stability. A placement point that aligns with the normal sightline can help keep menu content visible, while poor positioning may create glare or an obstructed display. Table crowding can reduce visibility when the holder competes with tableware or shared items. Stable placement can help prevent an unstable or ignored display.
Small tables may require a table menu stand to sit near the edge of the usable dining area so it remains visible without limiting space. On a booth table or shared counter, viewing angle and customer position may influence where a readable display is easiest to see. For broader placement contexts beyond table use, see where to place menu holders.
Easy reading also depends on table size, sightline, lighting, and service flow. The following checklist can help evaluate placement before final positioning.
- Open sightline: Place the holder where customers can read it directly, helping reduce an obstructed display.
- Limited table crowding: Keep the holder away from heavily used table areas so service flow remains less restricted.
- Appropriate viewing angle: Align the display with normal customer seating positions to support easy reading.
- Controlled glare: Avoid placement points where lighting reflections may reduce readability.
- Stable base position: Use a flat area that supports base stability and reduces the chance of an unstable display.
- Accessible display area: Leave enough surrounding space so the restaurant table stand remains visible without interfering with dining activities.
This chart shows the key placement criteria and checklist items for positioning table menu holders to ensure easy reading without interfering with service flow.

Keeping menus visible without crowding the table
Menu visibility should not reduce usable table space. A table layout works best when the holder remains easy to read without competing with plates, condiments, or service items that can crowd the display area.
Holder footprint, base position, surrounding objects, and customer reach all influence the balance between menu visibility and table space. A larger display footprint may contribute to clutter on smaller tables, while a poor base position can increase the risk of a blocked view or tipping. Customer reach and surrounding objects should be considered because table size, service items, and holder footprint can vary.
The following do-and-avoid list can help balance visibility with usable space.
- Do: Leave enough open table space around the holder for clear presentation. Avoid: Crowding the display with plates or condiments that may create a blocked view.
- Do: Use a stable base position that supports menu visibility. Avoid: Placing the holder where surrounding objects may increase tipping risk.
- Do: Keep the holder within comfortable customer reach. Avoid: Positioning the display where customers may need to move service items to read it.
- Do: Balance holder footprint with available table space. Avoid: Using a display footprint that may create unnecessary clutter.
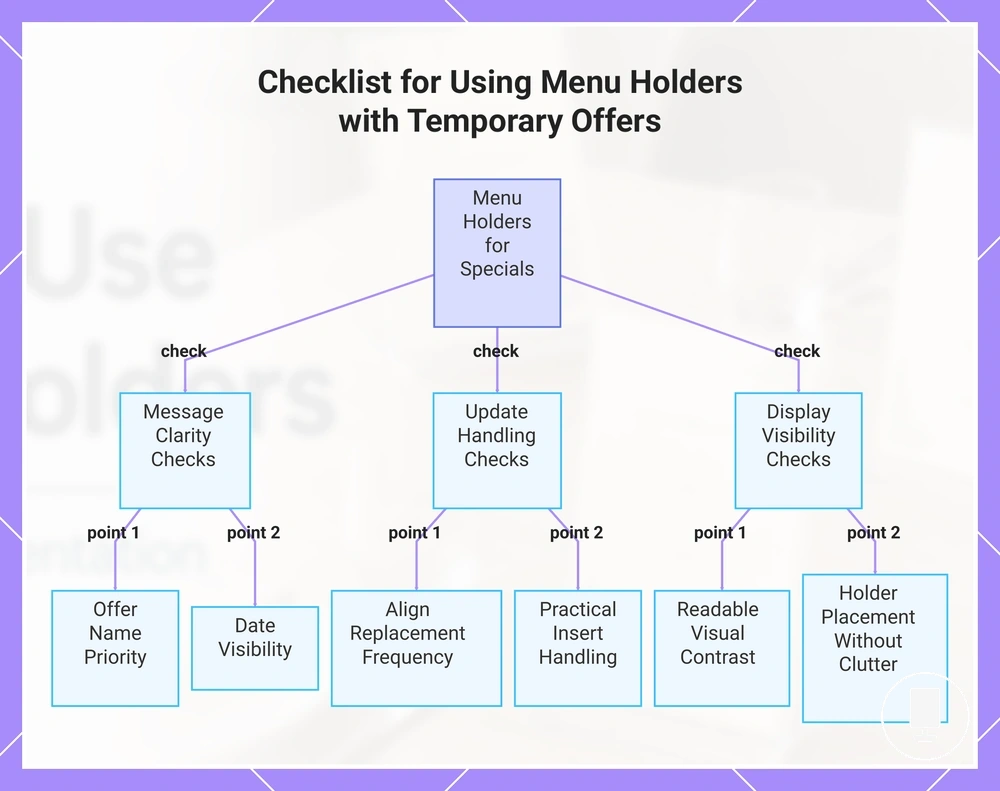
Using menu holders for specials and temporary offers
Menu holders work for specials and temporary offers when the insert is clear, current, and easy to replace. Temporary displays depend on message priority, update frequency, and insert handling so the offer remains understandable without creating clutter. Clear holder visibility can help keep the message noticeable while allowing updates when information changes.
Message priority should make the main offer name easy to identify first. The date should remain visible when a temporary offer depends on timing, because unclear timing can contribute to an outdated message. Update frequency influences how often insert replacement may be needed, so insert handling should remain practical. Visual contrast and holder visibility can support customer attention when the message remains simple and readable.
A daily specials insert, seasonal menu, or table notice can follow the same approach when the temporary message is brief and easy to update. For example, a seasonal menu may benefit from a visible offer name and date, while a table notice may depend more on message priority. Keep the display focused on clarity so temporary offers remain easy to understand after each update.
Use this checklist before displaying specials or temporary offers.
- Offer name: Keep the temporary offer easy to identify so the message is less likely to be lost in clutter.
- Date: Show the date clearly when timing affects whether the offer appears current.
- Visual contrast: Check that the message remains readable inside the holder without relying on excessive decoration.
- Update frequency: Match insert replacement to how often the offer changes so outdated messages are less likely.
- Holder visibility: Place the holder where customers can notice the specials without creating table clutter.
This chart shows the key checks for displaying specials or temporary offers in menu holders, covering message clarity, update handling, and display visibility.
Changing inserts without weakening presentation clarity
Changing inserts should preserve surface clarity and alignment so the holder remains clean, readable, and current. A careful insert change can support presentation clarity by reducing the risk of fingerprints, bending, and an outdated display.
Removal should be handled gently to help maintain edge condition during insert replacement. A surface check can identify fingerprints or marks that may reduce readability in a clear holder. Alignment and update timing help support a clean replacement that keeps the display current and easy to read.
Use these steps when changing inserts.
- Remove the existing insert carefully to help prevent edge damage, bending, or misalignment during the insert change.
- Perform a surface check on the clear holder and remove visible fingerprints or marks that may reduce presentation clarity.
- Align the new insert with the holder opening before placement to help prevent a tilted or less readable display.
- Review holder visibility after the update insert is in place so outdated content, alignment issues, or display distractions are easier to identify.
For broader care practices beyond insert changes, see how to maintain menu holders while keeping presentation clarity consistent over time.
Common setup mistakes that reduce menu clarity
When menu clarity becomes harder to maintain, setup mistakes are often the likely cause rather than the holder itself. Common clarity problems usually come from insert fit, glare, placement, dirt, instability, or outdated content, and a correction can often improve readability when the visible symptom is identified correctly.
Insert fit issues may reduce readability when blocked content or bending affects the visible area. Glare can become more noticeable when lighting, a clear panel, and the viewing angle interact unfavorably. Dirt, fingerprints, instability, and outdated content may also reduce menu clarity depending on table placement, holder condition, and update practices.
| Issue | Likely Cause | Visible Symptom | Correction |
|---|---|---|---|
| Insert fit problem | Insert size or trimming does not suit the holder opening | Blocked content or bending | Check insert fit and alignment for clearer readability |
| Glare | Lighting and viewing angle conditions | Reflections on the clear panel | Adjust placement or viewing angle when possible |
| Instability | Uneven base position or table placement | Wobbling holder | Reposition the base to improve stability |
| Dirt or fingerprints | Surface marks on the holder | Reduced clarity | Perform a surface check and remove visible marks |
| Outdated content | Missed updates | Old information remains visible | Replace the insert to restore display relevance |
Short diagnostic examples such as scratched clear panels, poorly trimmed inserts, or a wobbling holder can help identify a likely cause, but deeper damage or repair concerns fall outside this section. For more detailed diagnostics, see how to fix menu holder problems.