Common Menu Holder Problems, Causes, and Fixes
When menu holder problems appear, the likely cause is often a stability, surface, insert, base, or wear condition. The safest first response is cause-based troubleshooting, not assuming one fix works for every holder.
Symptoms such as wobbling, tipping, slipping inserts, clouding, scratches, or poor readability usually point to different causes. Base weight and surface contact may affect tipping, insert size or thickness may affect slipping, and surface damage may affect readability. Practical fixes can include repositioning, tightening, cleaning, changing inserts, or monitoring damage, but the right fix depends on material, fit, and use conditions.
On restaurant tables and counters, menu display holders face repeated staff handling, customer contact, and customer-facing readability needs. A holder that works in one position may become less readable or less stable in another setting, so the next sections diagnose symptoms before moving toward fixes and replacement cues.
This page covers common menu holder problems and fixes at a troubleshooting level. Deeper buying, material comparison, placement, and cleaning details remain secondary to identifying the symptom, cause, condition, and likely outcome.
Menu holder symptoms that affect stability, visibility, and use
Menu holder symptoms are visible or functional signs that the holder is not presenting the menu correctly. Menu holder problems usually appear as instability, poor readability, loose inserts, surface damage, or reduced usability. Most symptoms can be grouped by stability, visibility, fit, and use.
On a customer-facing table or counter, small issues can become more noticeable because guests and staff interact with the holder throughout the day. A menu holder described in a broader menu holders guide may show signs such as wobble, reduced visibility, loose inserts, or surface damage when operating conditions change. Recognizing symptoms early helps connect a symptom to its likely cause and severity, which is why symptoms should be checked before fixes.
Not every mark or wobble requires replacement. Minor scratches or light surface damage may be cosmetic, while recurring tipping, poor readability, loose inserts, or repeated handling issues can affect presentation and use. The practical boundary is whether the symptom remains a cosmetic inconvenience or begins to interfere with customer view, staff handling, stability, or safe placement.
The following symptoms can help organize the troubleshooting process:
- Wobble that may indicate a stability issue related to the base or its contact with the surface.
- Tipping during normal use that can affect presentation and customer-facing placement.
- Cloudy panels or scratches that may reduce visibility and readability.
- Loose inserts that slip or bend because insert fit, size, or thickness is not ideal.
- Damaged grips that may affect how securely inserts remain in place.
- Repeated handling problems that can make the holder harder to position or keep presentable.
Unstable menu holders and base problems
When an unstable menu holder wobbles, leans, slides, or falls over, the cause is usually related to base weight, base shape, surface contact, menu load, or placement conditions. An unstable menu holder often becomes unreliable when the base or surrounding conditions do not adequately support it. The most effective starting point is cause-first diagnosis.
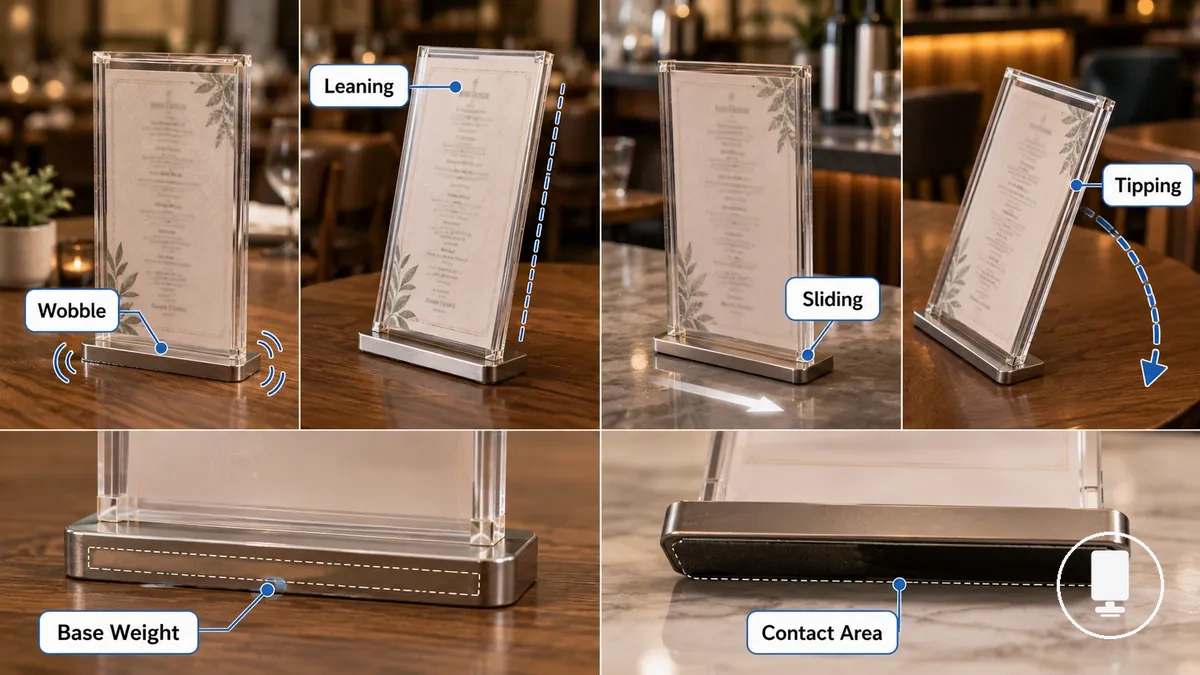
Wobble, leaning, sliding, and tipping often point to different base problems and should be checked separately. A wobble may relate to uneven contact area, while sliding may relate to moisture, a slippery surface, or reduced grip. Leaning can occur when menu load or insert height affects balance, and tipping may involve base weight, contact area, or placement conditions. The table below maps common symptoms to likely checks and safe fixes.
| Symptom | Likely Cause | Check | Safe Fix |
|---|---|---|---|
| Wobble | Uneven contact area or base issue | Check whether the base sits flat on the surface | Adjust positioning and improve contact with the surface |
| Leaning | Menu load imbalance or tall insert | Check insert height and weight distribution | Rebalance the menu load where appropriate |
| Sliding | Surface moisture, slope, or low grip | Check the condition of the table or counter | Reduce surface movement where possible |
| Tipping | Limited base weight or reduced support area | Check stability during normal handling | Review base support and placement conditions |
On high-traffic tables, frequent bumping can increase instability even when a holder appears stable during light use. Narrow counters, uneven surfaces, and tall inserts can also change how the same holder behaves. For placement-related factors, reviewing stable menu holder placement may help identify contributing conditions, although outcomes depend on the surface and operating environment.
Base-related causes and placement-related causes should be evaluated separately. Changes to the base may help in certain cases, but contact area, menu load, and placement conditions can also contribute to instability, so no single adjustment acts as a universal fix.
Light, loose, or uneven bases
When a menu holder keeps wobbling, a light base, loose base, or uneven base is often preventing firm contact with the contact surface. Instability can occur when the base cannot maintain consistent support, so the first checks should focus on base weight, tightness, and leveling.
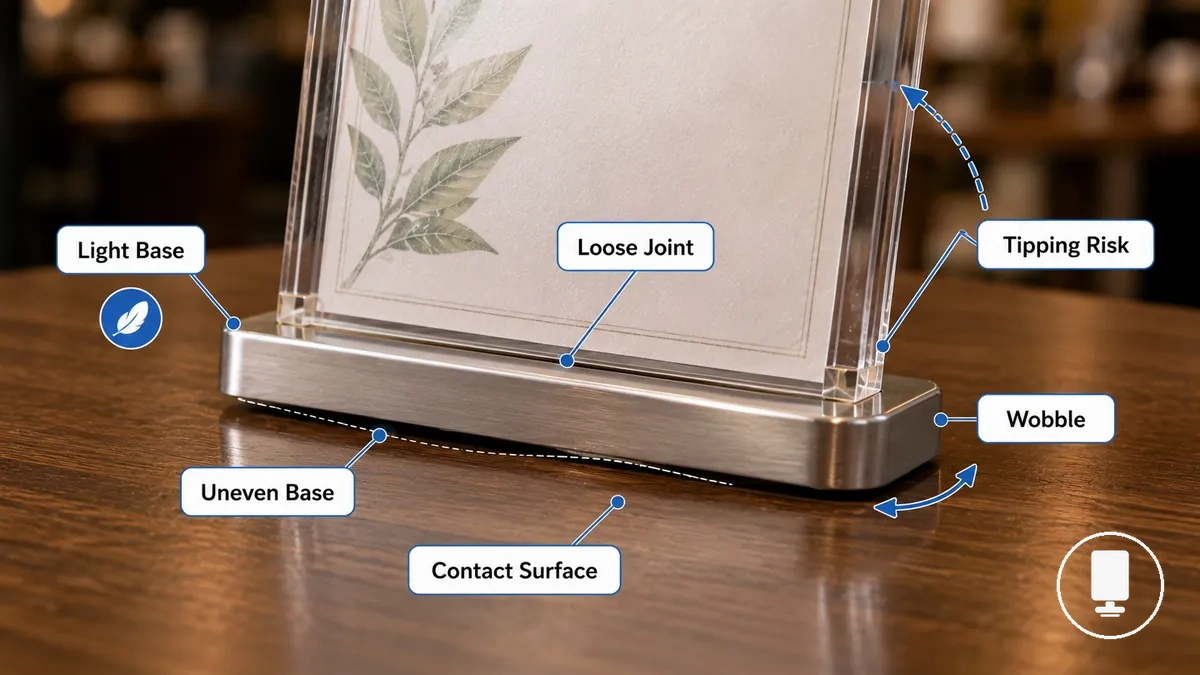
Light, loose, or uneven bases can create different instability symptoms:
- A loose joint can allow movement between base components, which may increase wobbling. Tightening can help when the movement comes from a connection point.
- A warped base can create uneven contact with the contact surface, increasing the risk of leaning.
- Cracked or worn contact points can reduce stable support and may contribute to wobbling or tipping.
- A light base may provide less support for a tall insert, which can increase tipping risk under certain conditions.
For example, a menu holder with a loose base connection may become more stable after tightening, while an uneven base may only need repositioning to improve contact with the surface. Replacement is not always necessary because the outcome depends on the specific base condition.
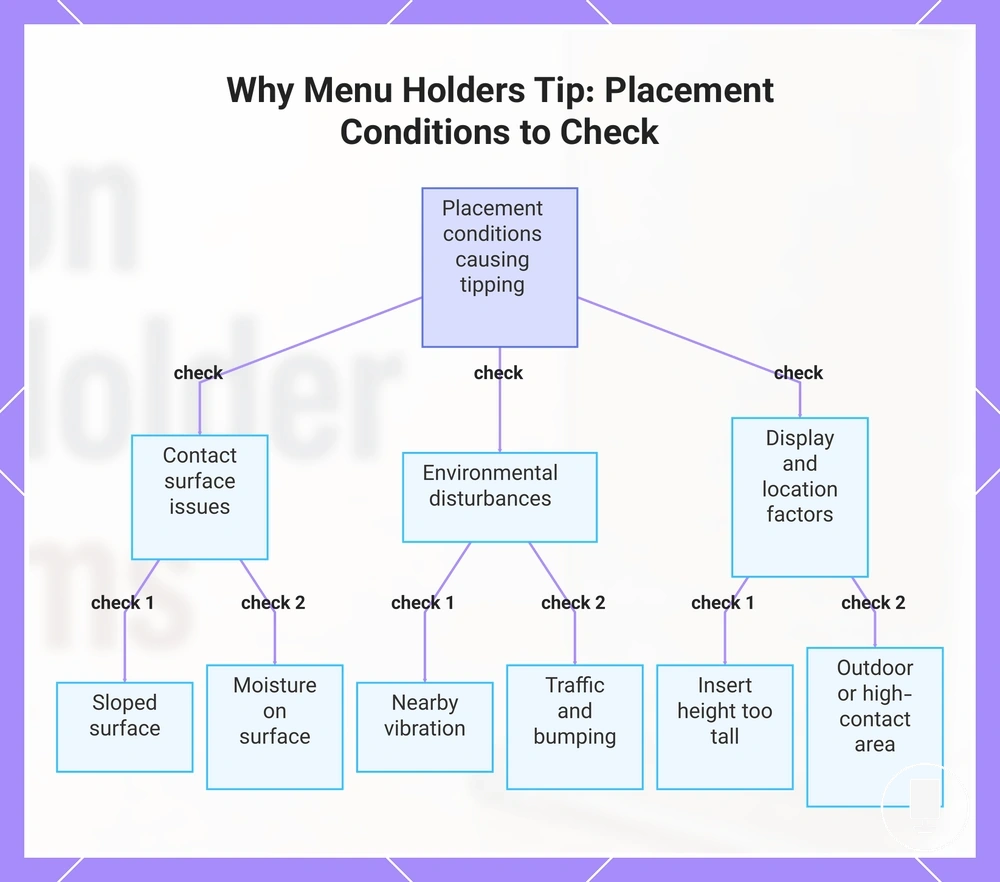
Table placement conditions that cause tipping
When a menu holder tips on a crowded table or narrow counter, the holder itself may not be the primary problem. Table placement and counter placement conditions can reduce stability by changing how the holder interacts with the surface. In many cases, placement conditions are the cause.
Slope, moisture, vibration, traffic, and insert height can each contribute to tipping or sliding. A surface that appears stable may still allow movement when exposed to bumping, moisture, or repeated contact. Before changing the holder, check whether placement conditions are creating the instability.
- Check for a sloped surface if the holder shows a tipping tendency in one direction.
- Check for moisture on the contact surface if sliding occurs during normal use.
- Check for vibration from nearby activity if movement appears without direct handling.
- Check for traffic and bumping around a crowded table or narrow counter if instability occurs repeatedly.
- Check insert height if a taller menu display appears more likely to tip during use.
Outdoor airflow or high-contact areas may also contribute to instability under certain conditions. If tipping occurs mainly near entrances, walkways, or exposed locations, reviewing the surrounding placement condition can help identify the cause before assuming a holder defect.
This chart shows the key placement conditions that can cause a menu holder to tip or slide, and the specific checks to identify the cause before assuming a holder defect.
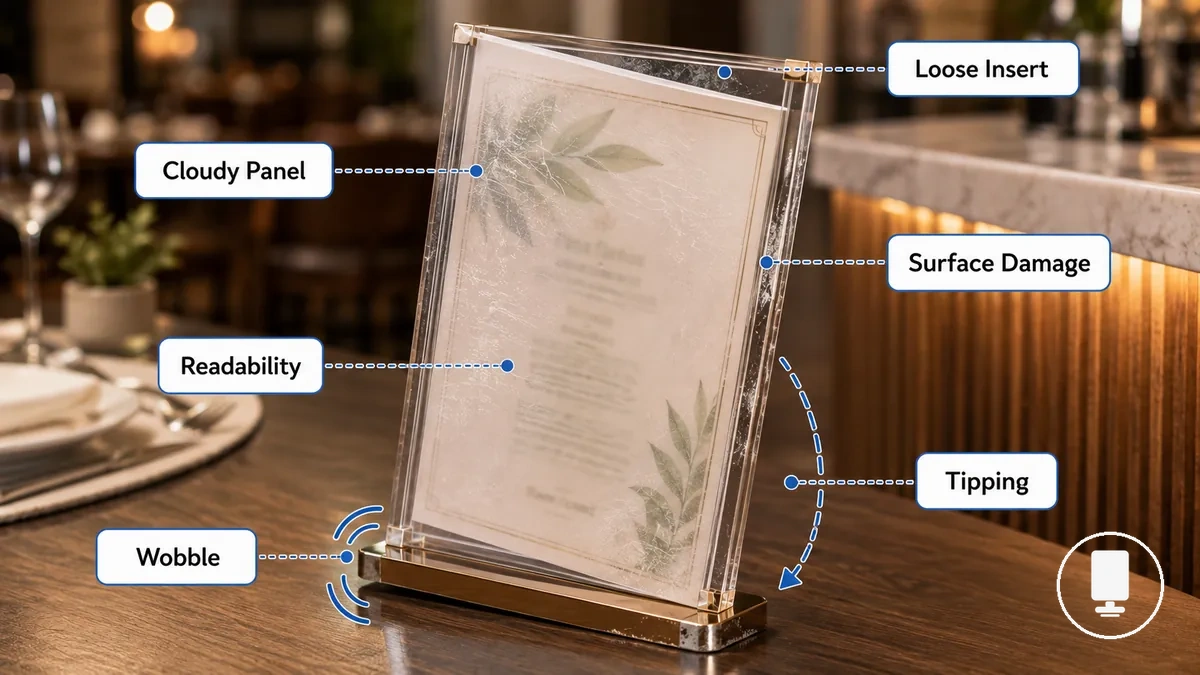
Scratched, cloudy, or visibly damaged menu holders
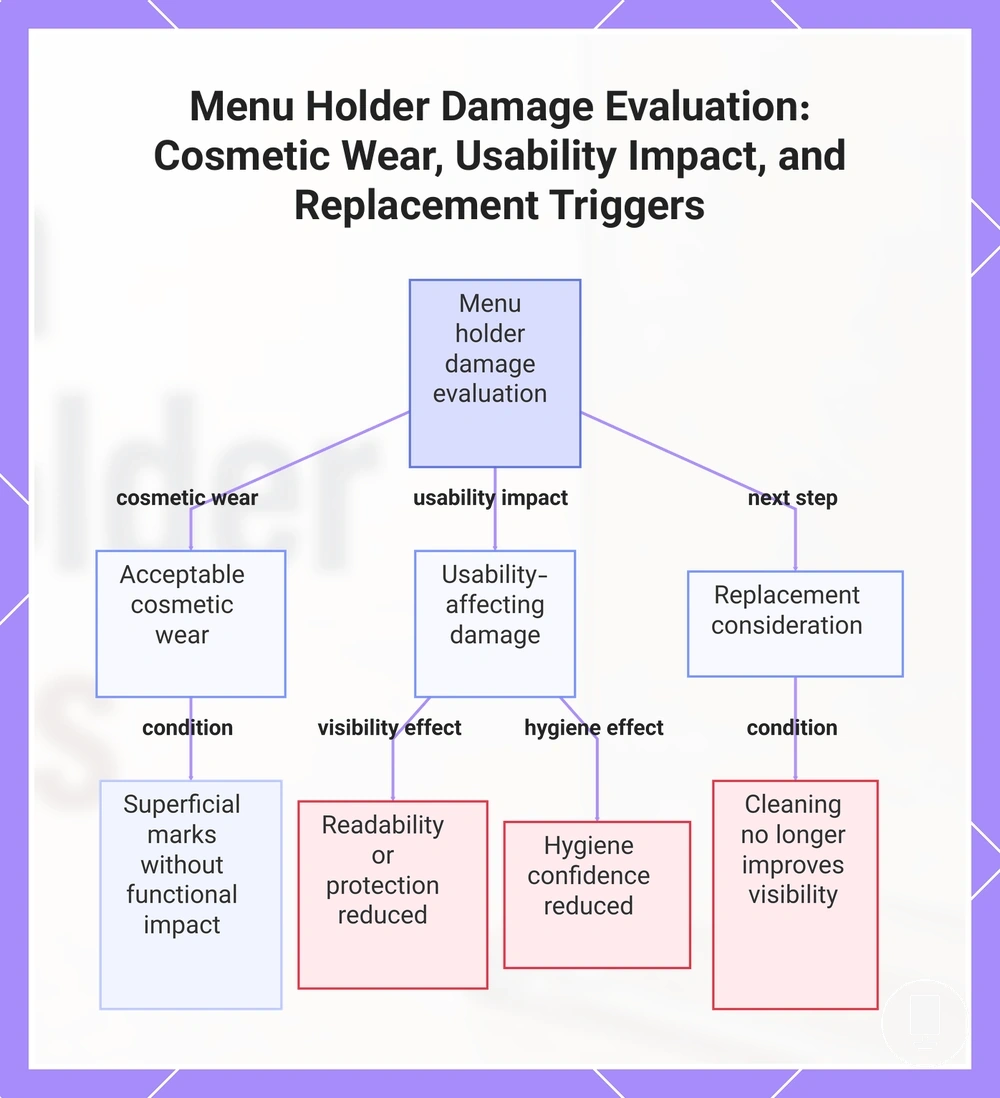
Visible damage matters most when it reduces readability, hygiene confidence, or menu presentation. Minor material wear may be cosmetic, but damage that affects menu visibility or insert protection often requires closer evaluation. Common signs include scratches, clouding, cracks, and staining.
How damage affects a menu holder depends on the damage type, severity, location, and material. Surface scratches on a customer-facing panel may reduce readability when they cross menu text, while clouding can make menu content harder to see through a clear panel. Cracks near edges or insert areas may affect insert protection, and staining can change appearance even when the holder remains functional. When cleaning no longer improves visibility or presentation, replacement need may become a consideration.
Acceptable cosmetic wear: Light surface marks, minor scuffs, or limited material wear that do not affect readability, insert protection, or menu presentation.
Damage that affects usability: Cloudy surface areas, deeper scratches across viewing zones, cracks near functional sections, or staining that noticeably affects visibility, appearance, or hygiene confidence.
On customer-facing clear panels and table displays, visible damage is often more noticeable because menu text remains in direct view throughout service. Damage signals can vary by material, so acrylic, clear plastic, wood, metal, and leather-look holders may show wear differently. For broader context on materials and damage risks, it can help to compare cosmetic wear with damage that affects readability or usability.
This chart shows the three main categories of menu holder damage evaluation: acceptable cosmetic wear, damage that affects usability, and the condition that triggers replacement.
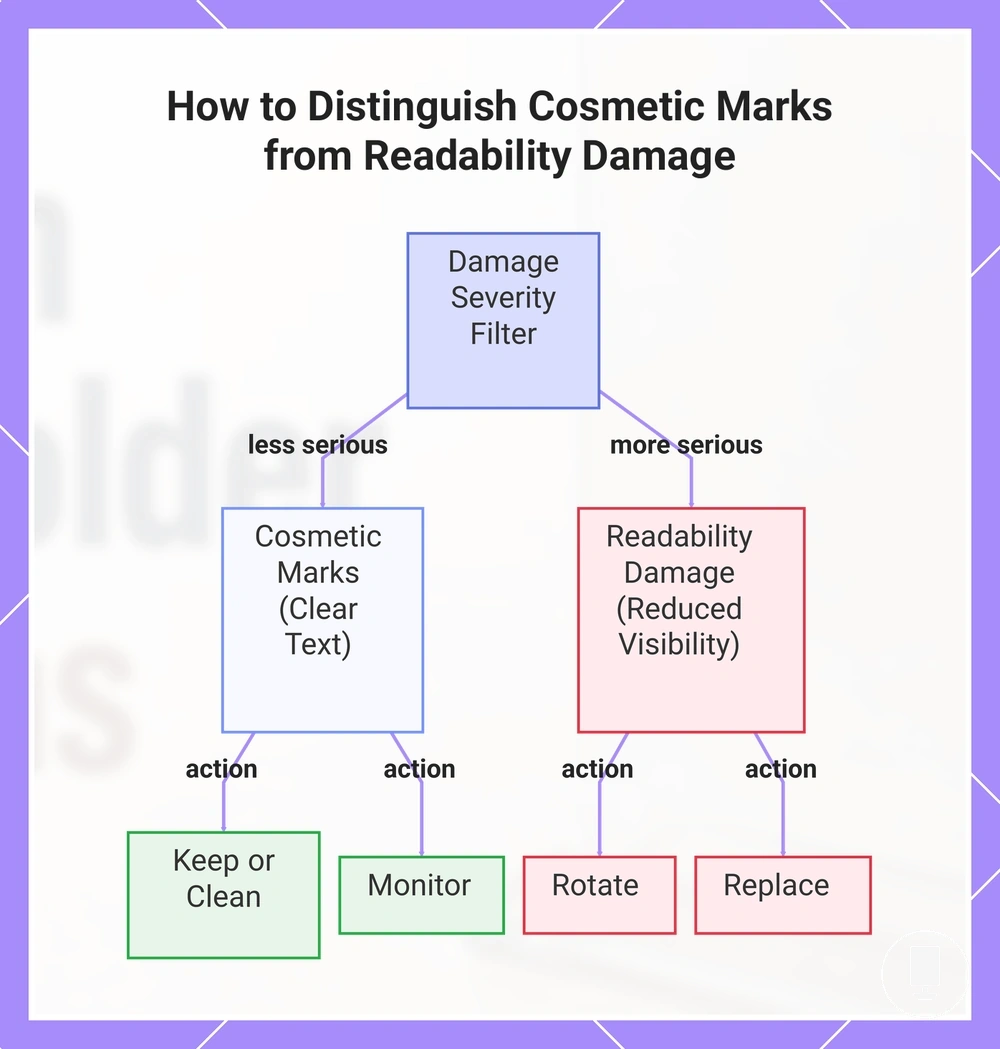
Cosmetic marks versus readability damage
Cosmetic marks are usually less serious when they do not block menu text or reduce customer-facing clarity. Readability damage becomes more important when scratches, clouding, or cracks interfere with visibility. The key evaluation criteria are location, depth, spread, and customer-facing impact.
Visibility damage should be judged by where it appears and how much of the viewing area it affects.
- Location: Surface marks near edges often have less effect on readability than marks across menu text or primary viewing areas.
- Depth: Light scratches may remain mostly cosmetic, while deeper scratches can create more noticeable readability damage.
- Spread: Limited marks in a small area may have a mild effect, while widespread clouding or cracks can increase severity.
- Customer-facing readability: If menu text remains clear, continued use, careful cleaning, or monitoring may be reasonable. If visibility is reduced, rotation or replacement may be a better option.
A side-edge scratch may remain a cosmetic mark because it does not interfere with menu text, while a cloudy front panel directly over printed menu text can reduce readability. Using this severity filter helps determine whether the condition supports keep using, clean carefully, rotate, or replace decisions based on customer-facing impact.
This chart shows how to evaluate damage based on customer-facing readability and decide whether to keep, clean, monitor, rotate, or replace.
Material wear and cleaning-related damage signals
Repeated cleaning friction or unsuitable cleaning habits can worsen material wear over time. Cleaning-related damage may develop gradually when abrasion or repeated exposure affects the surface condition of a menu holder. Common signals include scratches, clouding, peeling, swelling, and dullness.
Cleaning methods and handling practices can influence how wear appears on different surfaces. Watch for these caution signs when evaluating cleaning wear and visible damage:
- Repeated abrasion that increases scratches or creates a worn material appearance.
- Clouding that reduces visibility through clear viewing areas.
- Peeling surfaces that may affect appearance or insert presentation.
- Swelling that can change shape, fit, or surface condition after moisture exposure.
- Dullness that reduces clarity and contributes to an aged appearance.
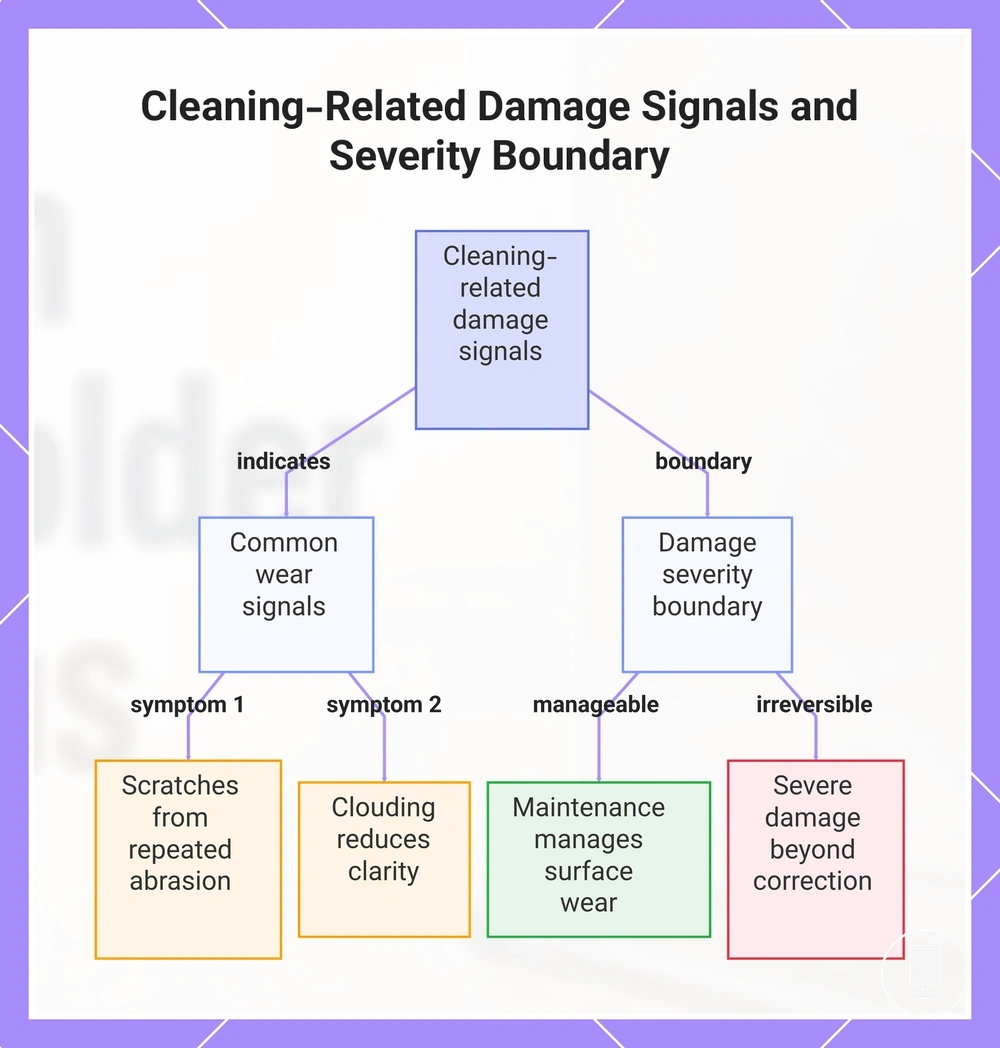
Maintenance may slow some wear, but it may not be reversible when cracks, deep clouding, or warped parts are already present. The effect on readability, durability, or replacement need depends on the severity and location of the wear signal. A practical boundary is that maintenance can help manage ongoing surface wear, while more advanced damage may remain beyond simple correction. For broader guidance on cleaning and maintenance, it can help to evaluate whether the issue is active wear or established damage.
This chart shows the most common wear signals from cleaning friction and the practical boundary between manageable surface wear and irreversible damage.
Menu inserts that slip, bend, or fit poorly
When menu inserts keep slipping or bending, the cause usually relates to fit, size, thickness, orientation, holder slot condition, or grip strength. Insert movement often occurs because the printed insert and holder slot are not working together as intended. The most useful approach is cause-based checking before considering changes to the insert or holder.
Loose, tight, bent, or misaligned menu inserts can point to different fit conditions. A loose fit may allow slipping during repeated handling, while excessive thickness or stiffness can contribute to bending, curling, or resistance inside the slot. Orientation and alignment can also affect readability when menu text becomes partially blocked or unevenly displayed. The table below separates insert-related causes from holder-related causes and maps symptoms to likely checks.
| Symptom | Likely Cause | Check |
|---|---|---|
| Slipping | Insert size issue or reduced grip strength | Check insert dimensions and slot contact |
| Bending | Thickness, stiffness, or tight fit condition | Check how the menu sheet enters and sits in the holder slot |
| Misaligned display | Orientation or positioning issue | Check alignment and visible menu text |
| Repeated movement | Worn slot opening or reduced grip strength | Check holder slot condition and handling wear |
For example, a laminated insert may create a tighter fit because of added thickness, while a folded card can sit unevenly if orientation is not correct. A worn holder slot may also allow movement even when the printed insert size appears appropriate. Checking fit and holder condition first can often help identify the cause before considering replacement.
Incorrect insert size, thickness, or orientation
Incorrect insert size, thickness, or orientation can make an insert slip, bend, or hide text. Insert fit depends on matching holder dimensions and slot tolerance. Start by checking insert size, thickness, orientation, stiffness, and slot tolerance.
When an insert is too small, slipping can occur because contact with the holder slot is limited. When thickness is too thin or too thick for the available slot tolerance, bending, friction, or poor positioning may develop. A rotated orientation, excessive stiffness, or a laminated insert can also affect visible text and readability, so fit correction depends on the specific condition.
Use this verification checklist before making any fit adjustments:
- Verify that the insert size matches the holder dimensions and does not leave excessive movement inside the slot.
- Check whether card thickness is appropriate for the available slot tolerance.
- Confirm that orientation keeps visible text aligned and readable.
- Check whether stiffness causes bending, resistance, or uneven positioning during insertion.
- Inspect slot tolerance to determine whether the insert fit is unusually loose or unusually tight.
For example, an undersized menu sheet may slip because contact with the holder slot is limited, while an overly thick insert may resist proper positioning. Verifying local fit conditions first can help identify the cause before making further adjustments.
Loose slots, clips, and grip points
Worn slots, weak clips, or loose grip points can allow insert movement even when the insert size is correct. When slipping, tilting, or movement continues after insert fit has been checked, the holder itself may be contributing to the problem. Focus on inspecting slots, clips, grip points, grip strength, slot width, clip tension, and surface friction.
Some weak grip issues can be adjusted, but cracked or widened holding points may remain unreliable. Reduced grip strength, increased slot width, or weakened clip tension can allow inserts to move during normal handling. When a grip area is cracked, widened, or no longer provides consistent support, replacement may be more practical than repeated adjustment.
Use this condition checklist after insert fit has been ruled out:
- Check slot width for widening that may allow a loose insert to slip or shift.
- Inspect clip tension to see whether reduced grip strength contributes to movement.
- Examine grip points for cracks that may increase the risk of a falling insert.
- Check surface friction inside the insert channel if inserts slide despite correct sizing.
- Inspect the grip area for wear that may reduce holding consistency during repeated handling.
As a local edge case, a holder may still grip paper while struggling to hold a laminated insert because thickness and surface friction can change how the holding points interact with the insert. This condition depends on the holder design and the condition of its grip components.
Fix options that match the cause of the problem
The practical fix should match the confirmed cause of the problem. A fix option based only on the visible symptom may not address the condition creating the issue, so avoid treating slipping, wobbling, or poor readability as the cause itself.
Start by checking the symptom, confirming the cause, and then choosing a low-risk fix, adjustment, or maintenance action. After the next action is applied, evaluate whether the condition improves or whether remaining risk is still present. The table below organizes symptoms, confirmed causes, and safe actions to support a practical repair direction.
| Problem | Confirmed Cause | Low-Risk Fix or Next Action | Expected Improvement or Remaining Risk |
|---|---|---|---|
| Poor readability | Dirt, smudges, or surface buildup | Maintenance action such as careful cleaning | Visibility may improve when surface damage is not the underlying cause |
| Instability or tipping | Placement condition or uneven surface | Adjustment through repositioning and stability check | Stability may improve when placement is the confirmed cause |
| Insert movement | Insert mismatch or fit condition | Adjustment to insert fit, orientation, or positioning | Movement may decrease when the mismatch is confirmed |
| Wobbling or structural weakness | Broken base or damaged support area | Evaluate replacement threshold | Remaining risk may continue if structural damage remains |
| Falling or unsecured inserts | Failed grip points, cracked clips, or widened slots | Assess condition and replacement threshold | Holding reliability may remain limited when damage persists |
A reversible issue such as dirt, placement, or insert mismatch can often respond to a maintenance action or adjustment. Structural damage such as a broken base, cracked panel, or failed grip point may continue creating risk even after troubleshooting steps are attempted. When structural damage affects core support or holding function, the replacement threshold may become the more practical decision point.
Cleaning, repositioning, tightening, and insert changes
Cleaning, repositioning, tightening, and insert changes are low-risk fixes for non-structural damage and other non-structural problems. These checks focus on dirt, placement, looseness, and insert mismatch rather than broken parts.
Each action should match a visible condition before any adjustment is made. Cleaning addresses dirt that affects visibility, repositioning addresses placement that affects stability, tightening addresses looseness that causes wobble, and insert changes address fit problems caused by insert mismatch. Stop applying low-risk fixes when cracks, deep damage, or failed parts indicate structural damage.
Use these steps only when the holder does not show structural damage:
- Use cleaning or a simple wipe when dirt affects visibility, and stop if readability does not improve because of clouding, cracks, or other damage.
- Use repositioning when placement affects stability, and reassess if wobble or tipping continues after a stability check.
- Use tightening when looseness causes wobble, and stop if the connection cannot remain secure or shows damage.
- Use insert changes when insert mismatch affects fit, such as adjusting thickness or changing insert orientation to reduce slipping.
- Review the outcome after each step, and move toward a replacement threshold if failed parts, a cracked part, or other structural damage remain.
Base support, weighting, and safer holder formats
A stability-focused format may help when instability remains after placement and base checks. Base support, weighting, footprint, holder height, and insert load should be evaluated before choosing safer holder formats. The goal is to match the format to the diagnosed tipping risk.
Base weight can improve support in some conditions, but weighting alone does not make every holder suitable for every table, counter, or high-contact area. A wider footprint may help when tipping risk comes from limited contact area, while lower holder height or lighter insert load may help when balance is the issue. Format changes should solve the diagnosed stability cause rather than replace proper placement and use.
Use these criteria before considering a format change:
- Check base support if the holder tips because the base does not provide enough contact with the surface.
- Check weighting if insert load or holder height makes the holder feel top-heavy during normal use.
- Check footprint if a narrow base allows movement on tables, counters, or high-contact areas.
- Check holder height if tall inserts increase tipping risk or make the holder less suitable for the use environment.
- Check use environment before choosing a stability-focused format, because table use, counter use, and high-contact areas can create different stability needs.
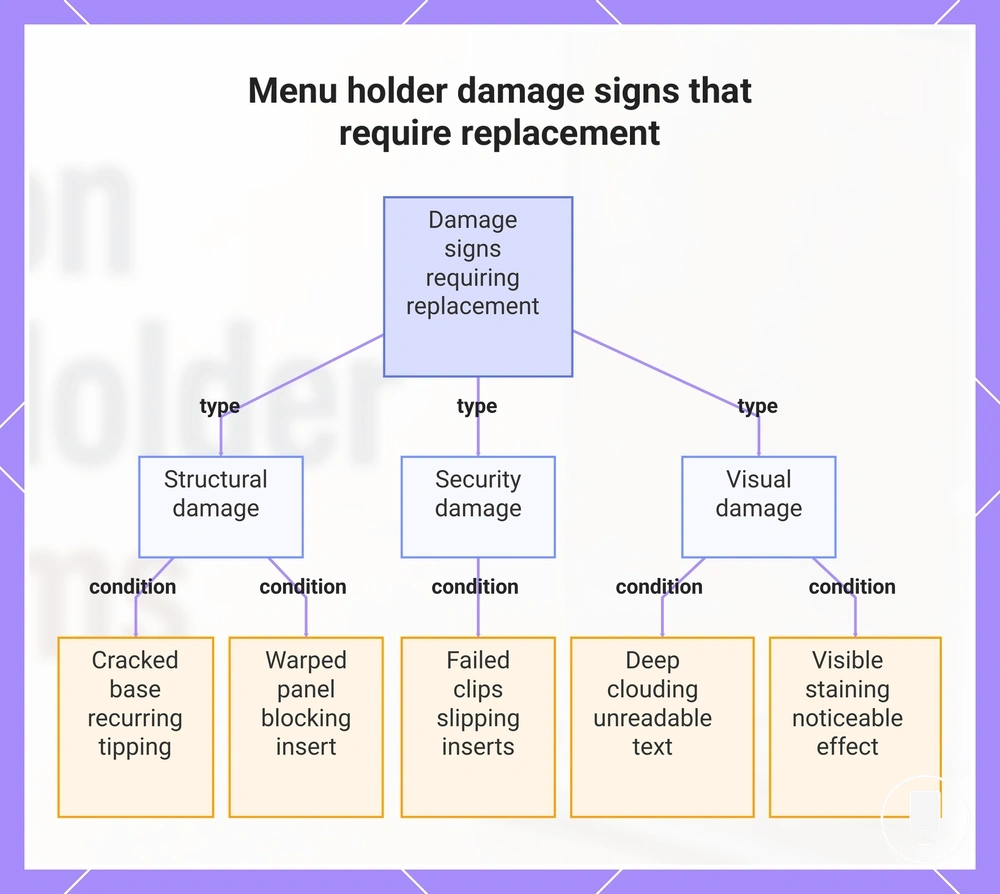
Damage signs that make replacement more practical
Replacement becomes more practical when damage continues to affect stability, readability, hygiene appearance, or insert security after reasonable low-risk fixes. Minor wear can often be monitored or maintained, but persistent damage should be judged by a clear threshold. The decision should separate what can be maintained from what keeps affecting use.
Replacement signs should be judged by severity, recurrence, and customer-facing effect. A damage sign matters more when it repeatedly affects the same attribute after cleaning, repositioning, tightening, or insert changes. Use the mini-checklist below to decide whether to monitor, maintain, or replace.
- Cracked base affecting stability: replace when tipping or wobbling recurs after placement and base checks.
- Deep clouding affecting readability: replace when menu text remains difficult to read after low-risk cleaning.
- Warped panel affecting presentation or insert fit: monitor if mild, but replace when the panel keeps bending or blocking the insert.
- Failed clips affecting insert security: replace when inserts keep slipping or falling after fit and grip checks.
- Visible staining affecting hygiene appearance: maintain if light, but replace when the customer-facing effect remains noticeable.
Cracked bases, deep clouding, warped panels, failed clips, and repeated tipping are practical threshold examples, not product recommendations. If the same issue keeps returning after low-risk fixes, compare the remaining damage with when to replace menu holders before continuing repeated adjustments.
This chart shows the main damage categories and the specific conditions under which menu holder replacement becomes practical.