Menu Holder Cleaning and Maintenance
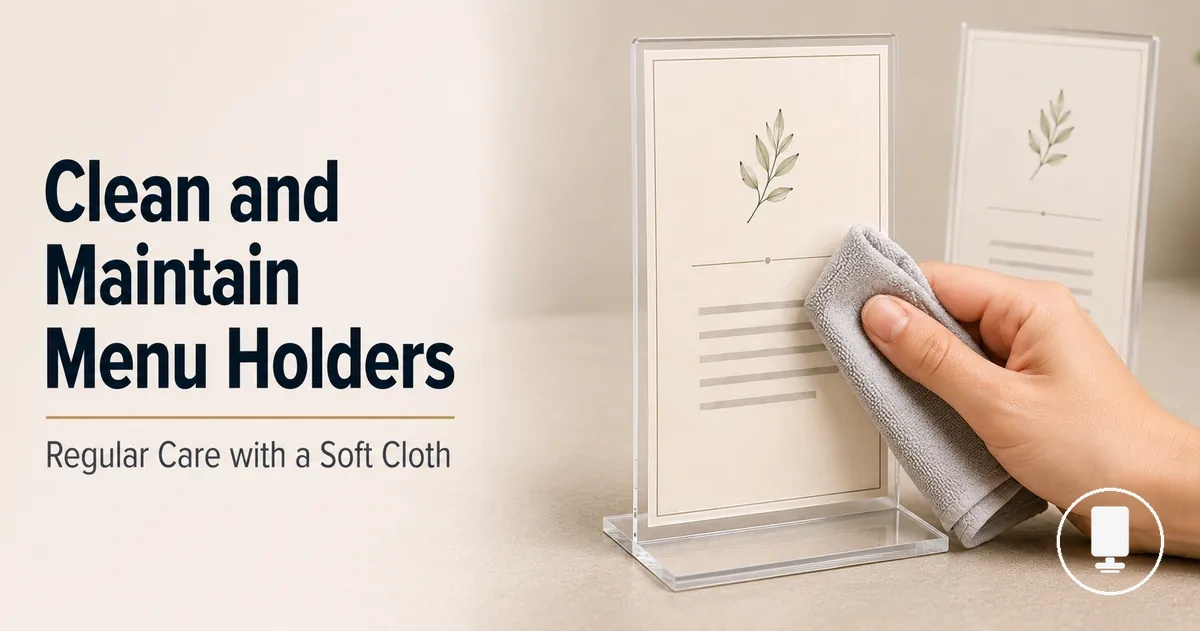
Menu holder cleaning is the routine surface care that keeps menu holders clear, usable, and presentable while protecting the printed inserts inside them. Menu holder maintenance also includes checking surface condition, insert pockets, and drying after each wipe clean process. Regular upkeep helps menu displays stay clean, readable, and presentable without turning cleaning into a product or repair claim.
Menu holders can collect fingerprints, food marks, stains, and residue, and rough handling may increase scratches or surface wear. A soft cloth, mild soap, warm water, and careful drying are usually the safer starting points before stronger treatment is considered. Acrylic and clear plastic holders may show clouding or scratches more visibly, while leather-look menu covers may need lower moisture and careful drying. Safe care depends on material, soil level, cloth choice, moisture, and drying.
Start gently, remove residue, and dry the holder before putting inserts back in place. Cleaning and maintenance can reduce everyday grime and wear risk, but they cannot reverse deep cracking, warping, or severe surface damage. The next step is to define what regular upkeep must preserve.
Menu Holder Maintenance Basics
Menu holder maintenance means keeping the holder clean, readable, stable, and presentable without damaging its surface or inserts. Proper upkeep helps menu holders maintain visibility, support insert fit, and preserve a usable display condition during normal use. The main maintenance outcomes are cleanliness, readability, stable presentation, and consistent surface condition.
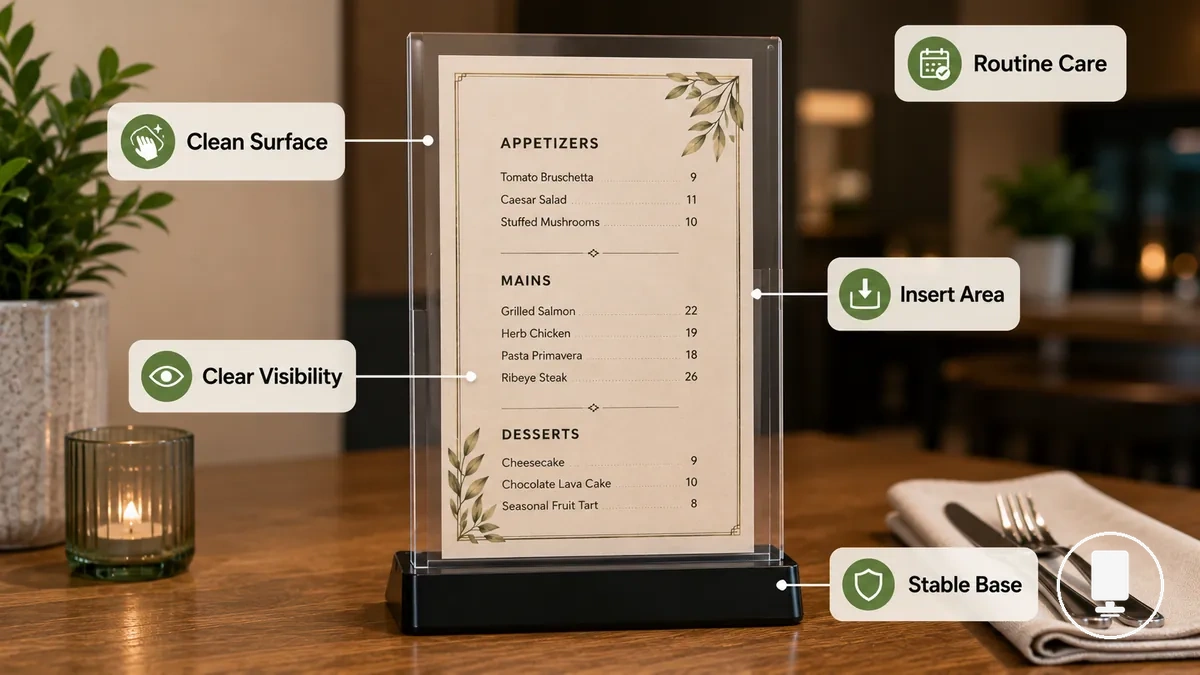
Menu Holder Maintenance Basics organizes the main upkeep priorities that regular care is meant to protect. The image below highlights the visible areas that routine maintenance focuses on, including the holder surface, insert area, and support base.
- Keep surfaces clean to reduce visible residue and support presentation.
- Maintain clear visibility so menu content remains readable.
- Keep insert pockets dry to help reduce moisture-related wrinkling of inserts.
- Check stable placement to support consistent use on a dining table or counter.
- Observe changes in surface condition and the insert area during routine care.
When menu holders are handled frequently, fingerprints, residue, and minor wear may appear more quickly. Cleaning frequency often depends on handling frequency, display location, and how quickly buildup affects readability. Routine maintenance can support usability, visibility, and presentation, but it does not fix severe cracking, warping, or deep surface damage because those conditions extend beyond normal upkeep.
Safe Cleaning Supplies for Menu Holders
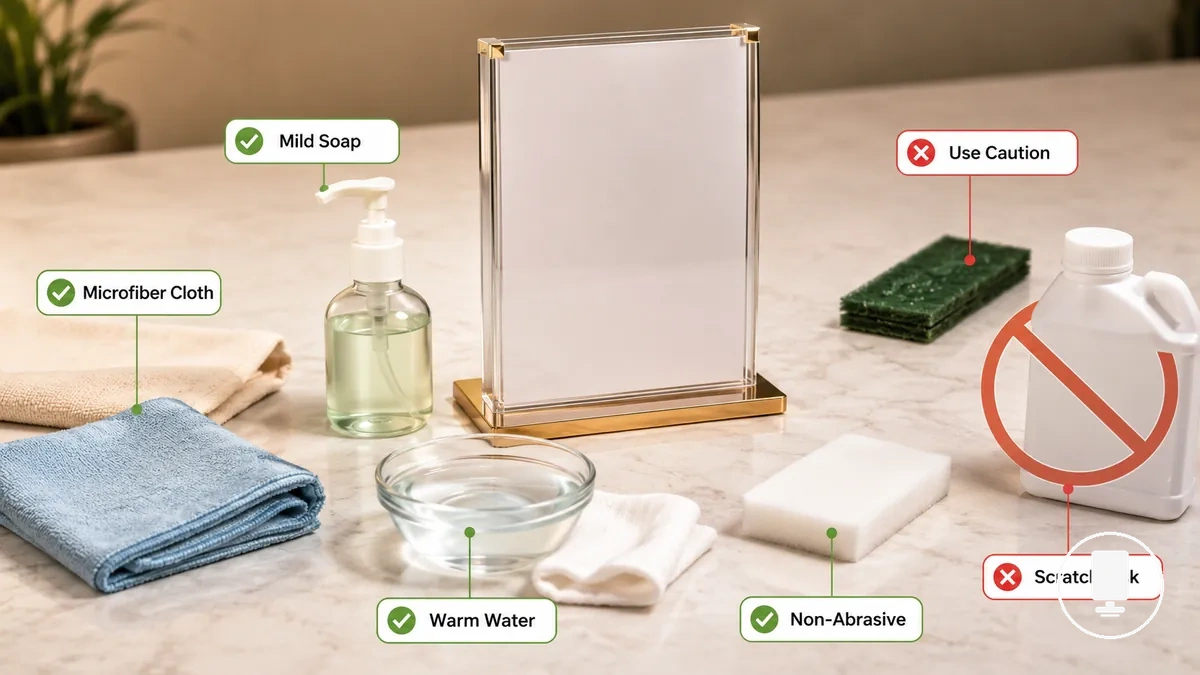
Safe cleaning supplies depend on surface material, soil level, and scratch risk. A microfiber cloth, soft cloth, mild soap, and warm water are usually suitable starting points because they can help remove residue with a lower risk of surface damage. The preferred approach is to begin with the least aggressive effective cleaning option.
When residue, fingerprints, or light buildup remain on a menu holder, stronger products may seem necessary. Cleaner strength should match material sensitivity because different surfaces can react differently to the same cleaning method. Safe Cleaning Supplies for Menu Holders organizes supplies by safety condition and helps separate usually safe options, conditionally safe options, and supplies that may increase scratch risk.
| Supply | Safe condition | Why it helps | Use with caution when |
|---|---|---|---|
| Microfiber cloth or soft cloth | Used on surfaces with low scratch risk | Supports gentle wiping and residue control | Surface already shows visible wear |
| Mild soap | Mixed as a mild solution when needed | Can help loosen light residue | Surface material sensitivity is uncertain |
| Warm water | Applied with a damp cloth | Helps reduce residue without increasing cleaner strength | Moisture may affect inserts or seams |
| Disinfectant or sanitizer | Material allows its use | May provide additional cleaning support | Surface reaction is unknown or untested |
| Tools to avoid | Non-abrasive alternatives are available | Helps reduce scratch risk and clouding risk | Using abrasive pads or aggressive cleaning tools |
Consider stronger cleaners only after gentler options have been evaluated and the material allows their use.
Soft Cloths and Mild Soap
Soft cloths and mild soap are usually the preferred starting option when surface material, residue, and scratch risk need to be managed carefully. A microfiber cloth or soft cloth can help lift residue with gentle wiping, while a mild soap solution supports light cleaning. Together, they help reduce scratch risk when used with controlled wiping pressure.
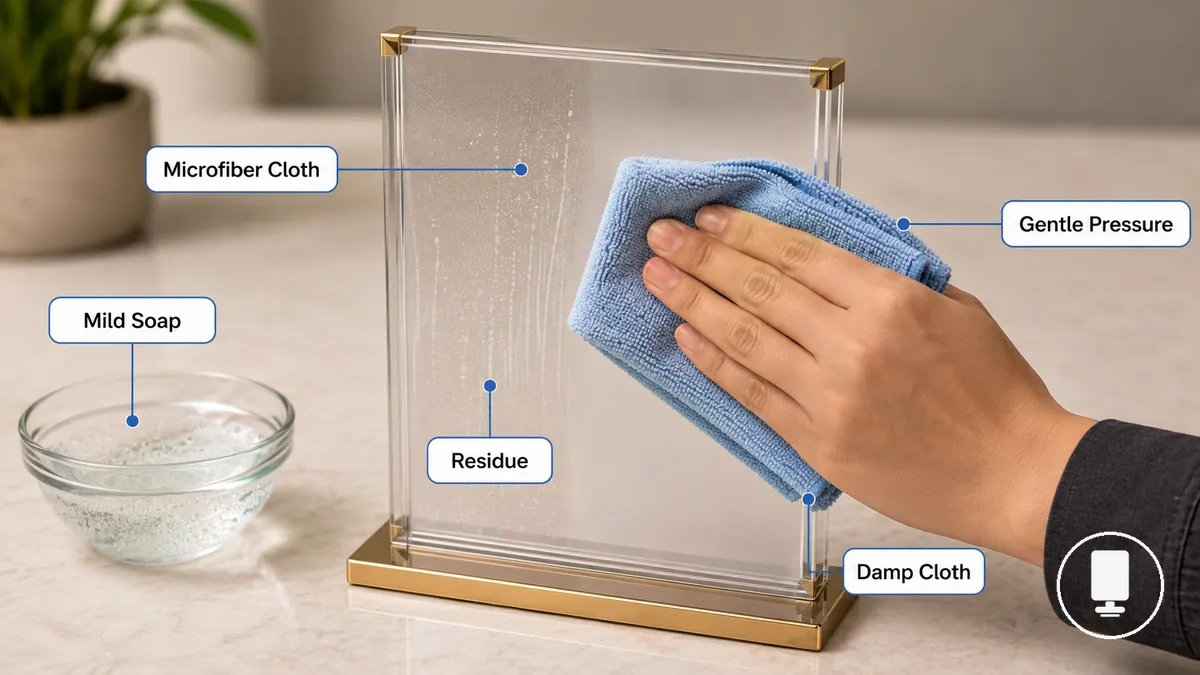
When fingerprints or light residue remain on a menu holder, a damp cloth and mild soap may be enough before stronger cleaning methods are considered. Soap dilution, moisture level, and wiping pressure work together to influence residue removal and surface condition. If the cloth or soap is uncertain, use caution with excess moisture and overly concentrated cleaning solutions.
Cleaners and Tools to Avoid
When menu holders develop scratches, clouding, peeling, or persistent residue after cleaning, the cleaning tool or cleaner may be contributing to the problem. Filtering out higher-risk tools and substances can help reduce damage risk.
Cleaners and Tools to Avoid filters items that may increase surface damage risk depending on material sensitivity, finish condition, cleaner concentration, or moisture exposure:
- Abrasive pads increase the risk of scratches, especially on clear plastic or acrylic surfaces.
- Rough paper towels may create fine surface marks when used with repeated wiping pressure.
- Strong solvents may contribute to clouding, finish changes, or peeling on sensitive surfaces.
- Excess moisture can collect around seams, pockets, or inserts and may leave residue or affect nearby components.
- Concentrated disinfectants may leave residue or raise surface-compatibility concerns when cleaner strength is higher than needed.
- Harsh cleaners and rough tools can increase the likelihood of surface damage when material sensitivity is uncertain.
How to Clean Menu Holders Safely
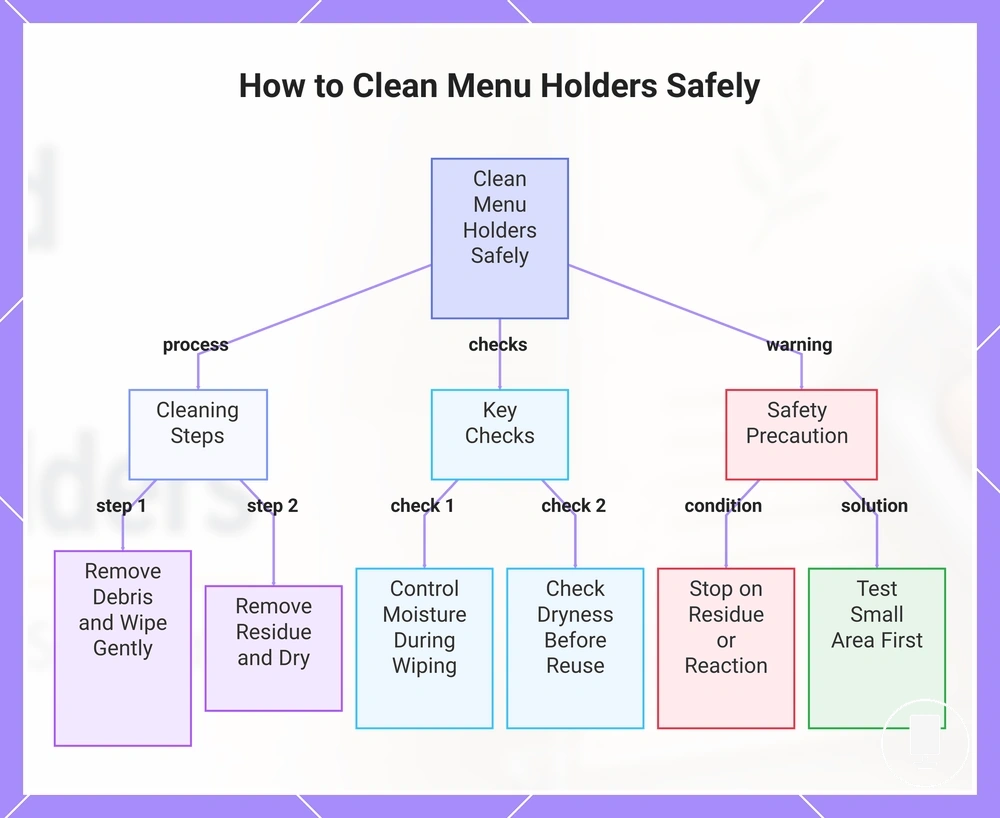
To clean menu holders safely, remove debris, wipe gently with a mild solution, remove residue, and dry before reuse. This cleaning sequence helps manage surface condition and moisture while keeping inserts and visible areas usable. Follow the sequence in order: remove debris, wipe gently, remove residue, and dry before reuse.
- Remove debris from the holder surface, seams, slots, and insert pockets. Check for loose crumbs or dust so particles are cleared before wiping.
- Wipe gently across the holder surface with a damp cloth and mild solution. Check that cloth moisture is controlled so the surface is cleaned without excess wetness.
- Clean seams, slots, and areas around inserts using light wiping pressure. Check for trapped residue so narrow spaces remain clear with less moisture buildup.
- Remove remaining residue with a clean damp cloth. Check that cleaner traces are lifted from the surface so a cleaner finish remains.
- Dry the holder surface, seams, slots, and inserts before reuse. Check that insert pockets and visible surfaces are dry so moisture is not left behind.
If residue remains or the finish reacts unexpectedly, stop and reassess the cleaning approach before continuing. When material sensitivity or finish type is uncertain, test a small test area first for safer cleaning.
This chart shows the cleaning steps, key checks, and a safety precaution for cleaning menu holders safely.
Remove Dust, Crumbs, and Loose Debris
Remove dust, crumbs, and loose debris before wet wiping. Loose particles often collect along edges, slots, corners, the base, and insert openings, where they can spread or smear during cleaning. Clearing loose debris first helps reduce scratching and smearing before wet wiping begins.
- Edges and corners: Clear dust, crumbs, and dry debris from exposed edges and menu holder corners.
- Slots and insert openings: Remove trapped particles around slots and insert openings, especially where paper inserts may collect loose debris.
- Base: Check the base for loose dirt and crumb buildup before introducing moisture.
- Recessed areas: Clear dry debris from narrow spaces where particles may remain hidden before wet wiping.
Wipe With Warm Soapy Water
Wipe the holder surface with warm soapy water using a lightly damp cloth and diluted mild soap. Apply gentle pressure and follow a consistent wiping direction across the surface instead of leaving excess moisture behind. Keep the cloth damp, not dripping, so the wiping pass stays gentle and controlled.
If sticky or greasy marks remain, repeated light passes may be safer than heavy pressure. Use a follow-up wipe with a clean water wipe or lightly damp cloth to support residue removal, and check that no visible soap residue remains on the surface.
Dry Before Reusing Menus and Inserts
Dry before reuse by checking that all contact areas are free from moisture. A dry surface helps limit moisture marks, while trapped dampness in seams, pockets, or around insert edges may contribute to insert wrinkling or residue transfer depending on the insert material and moisture level. Wet or damp contact areas can create practical reuse problems, including moisture marks, trapped dampness, insert wrinkling, and residue transfer.
Dry Before Reusing Menus and Inserts verifies all contact areas are dry. Before placing menu inserts back and using menu holders, check these moisture-sensitive areas:
- Surface: Confirm the dry surface has no remaining moisture marks.
- Seams: Check seams for trapped dampness that may remain after cleaning.
- Pocket interior: Verify pockets are air-dry and free from damp pockets.
- Insert edges: Check insert edges for moisture that may contribute to insert wrinkling.
- Printed menu contact points: Confirm printed menu contact points are dry to help reduce residue transfer.
Cleaning Differences by Menu Holder Material
Cleaning Differences by Menu Holder Material means the cleaning method changes because each material responds differently to moisture, friction, and cleaner choice. Acrylic, clear plastic, vinyl, and leather-look surfaces can show different levels of surface sensitivity during routine cleaning. Material differences affect cleaning pressure, cleaner choice, and drying care, which can change cleaning risk and maintenance outcome.
When a cleaning method is used across different materials, the same amount of moisture or friction may not produce the same result. Cleaning Differences by Menu Holder Material compares cleaning pressure, cleaner choice, and drying care so material-specific handling remains appropriate as finish condition, material quality, and age vary. For broader comparison beyond cleaning implications, see menu holder materials.
| Material | Cleaning sensitivity | Safer cleaning condition | Main risk to avoid |
|---|---|---|---|
| Acrylic or clear plastic | May show higher surface sensitivity to friction | Microfiber cloth, gentle wiping, and controlled moisture | Clouding or scratches |
| Vinyl or wipe-clean covers | May be more sensitive around seams and moisture retention areas | Light wiping and careful drying care | Moisture remaining near seams |
| Leather or leather-look holders | Finish may react differently to moisture and friction | Low moisture and gentle wiping | Peeling or finish changes |
This comparison focuses on cleaning behavior and maintenance outcome only and does not determine the best material overall.
Acrylic and Clear Plastic Menu Holders
Acrylic and clear plastic menu holders need gentle wiping to help protect the clear surface and maintain readability. A microfiber cloth, mild soap, controlled wiping pressure, and careful drying can help reduce visible cleaner residue on transparent surfaces. Clear surfaces show smudges and residue more visibly, and aggressive cleaning may increase the risk of clouding or scratches.
For clear-surface care, focus on these local cleaning checks:
- Use a microfiber cloth to reduce friction on the clear surface.
- Apply mild soap with gentle wiping pressure instead of abrasive rubbing.
- Remove cleaner residue before it dries on the transparent surface.
- Complete drying with a clean cloth to help reduce visible water marks and residue.
Vinyl and Wipe-Clean Menu Covers
Vinyl and wipe-clean menu covers usually tolerate gentle surface wiping when moisture level and cleaner strength remain controlled. The flexible cover surface can be cleaned with light wiping, but seams, corners, and areas around printed inserts may need additional care. Wipe-clean surface care and seam care should be treated as separate cleaning concerns.
Wipe-clean does not mean safe to soak. When moisture collects around seams, corners, or pocket areas, drying time may become more important because dampness can affect printed inserts or contribute to wrinkling in some cases.
- Use gentle surface wiping with a mild cleaner on the flexible cover surface.
- Check seams and corners for trapped moisture after cleaning.
- Keep cleaner strength appropriate for routine cleaning rather than using unnecessarily strong products.
- Allow sufficient drying time before returning printed inserts to pocket areas.
Leather and Leather-Look Menu Holders
Leather and leather-look menu holders should be cleaned with lower moisture, gentle wiping, and careful cleaner selection. The surface finish on leather, faux leather, and leather-style menu covers may respond differently to moisture exposure, cleaner type, and rubbing pressure, so cleaning should remain controlled. Lower-moisture cleaning helps support appearance while respecting finish sensitivity.
For finish-sensitive surface care, keep these cautions in mind:
- Use lower moisture levels and allow appropriate drying behavior after cleaning.
- Choose a cleaner type carefully, as finish response may vary between leather and leather-look covers.
- Keep rubbing pressure light to help reduce unnecessary wear on the surface finish.
- If peeling or cracked covers are already present, replacement assessment may be more appropriate than heavier cleaning because cleaning has limits when damage is severe.
Removing Stains, Grease, and Smudges
Minor stains, grease, and smudges should be treated with repeated gentle cleaning before stronger methods are considered. Stain response depends on the mark type, surface material, surface finish, and how long the mark has remained. Start with a mild cleaner, controlled contact time, and moderate wiping pressure before considering more aggressive cleaning.
Stains, grease, and smudges can respond differently depending on grease level, residue buildup, and surface condition. Fingerprints and surface smears may lift quickly, while sticky residue, food grease, or light discoloration may require repeated cleaning response with careful attention to surface risk. Removing Stains, Grease, and Smudges is easier when mark type is matched to a safe cleaning response, as shown below.
| Mark type | First response | Risk to avoid | When to stop |
|---|---|---|---|
| Fingerprints | Microfiber cloth with a mild cleaner | Excess wiping pressure on the surface finish | When improvement is no longer visible |
| Food grease | Repeated wiping with a mild cleaner | Heavy rubbing that may increase surface wear | When grease remains despite gentle treatment |
| Sticky residue | Allow short contact time before gentle wiping | Scraping or aggressive removal attempts | When surface risk begins to increase |
| Light discoloration | Gentle cleaning while monitoring the surface finish | Repeated treatment with limited improvement | When no further visible change occurs |
Deep stains, old marks, or embedded discoloration may not fully lift without increasing surface risk.
Sanitizing Menu Holders Without Surface Damage
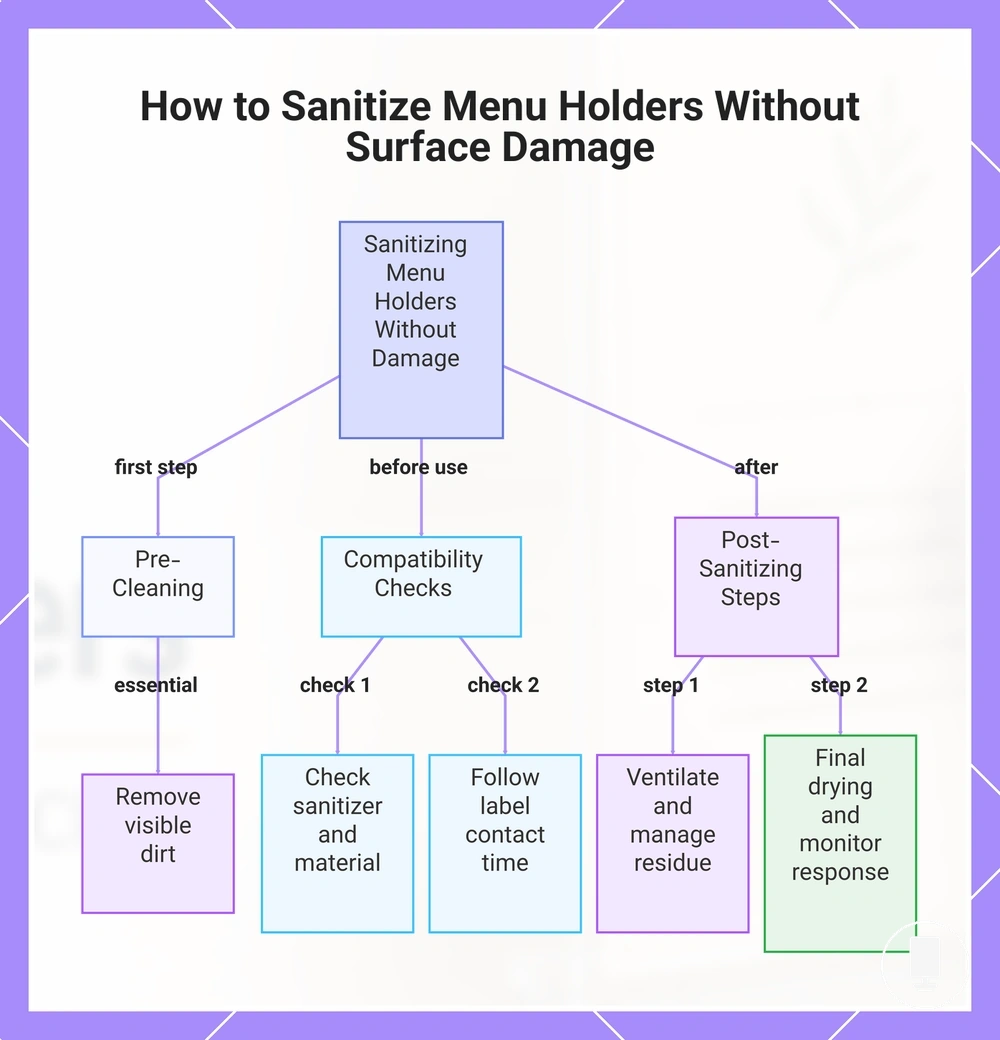
Sanitizing should reduce hygiene risk while helping preserve the menu holder surface and insert area. Cleaning first is essential because visible dirt can interfere with sanitizing and may leave residue behind. Visible dirt should be cleaned before sanitizing.
When sanitizing raises concerns about surface damage, sanitizer compatibility, sanitizer strength, contact time, and material sensitivity should be checked before use. Surface compatibility, ventilation, residue management, and final drying may influence how a menu holder responds, especially around inserts and moisture-sensitive areas. Sanitizing Menu Holders Without Surface Damage depends on compatibility and drying checks such as those below.
- Confirm visible dirt has been removed before sanitizing.
- Check sanitizer compatibility with the menu holder material and insert area.
- Follow product label directions for contact time rather than extending contact duration unnecessarily.
- Maintain ventilation when using sanitizing products.
- Remove residue if product directions indicate a residue wipe is needed.
- Complete final drying before returning inserts to the holder.
Sanitizing is not a substitute for removing visible dirt, and surface response may vary depending on material sensitivity, surface compatibility, and product use conditions.
This chart shows the key steps and checks to sanitize menu holders while avoiding surface damage, including pre-cleaning, compatibility checks, and post-application care.
Preventing Scratches, Fading, and Surface Wear
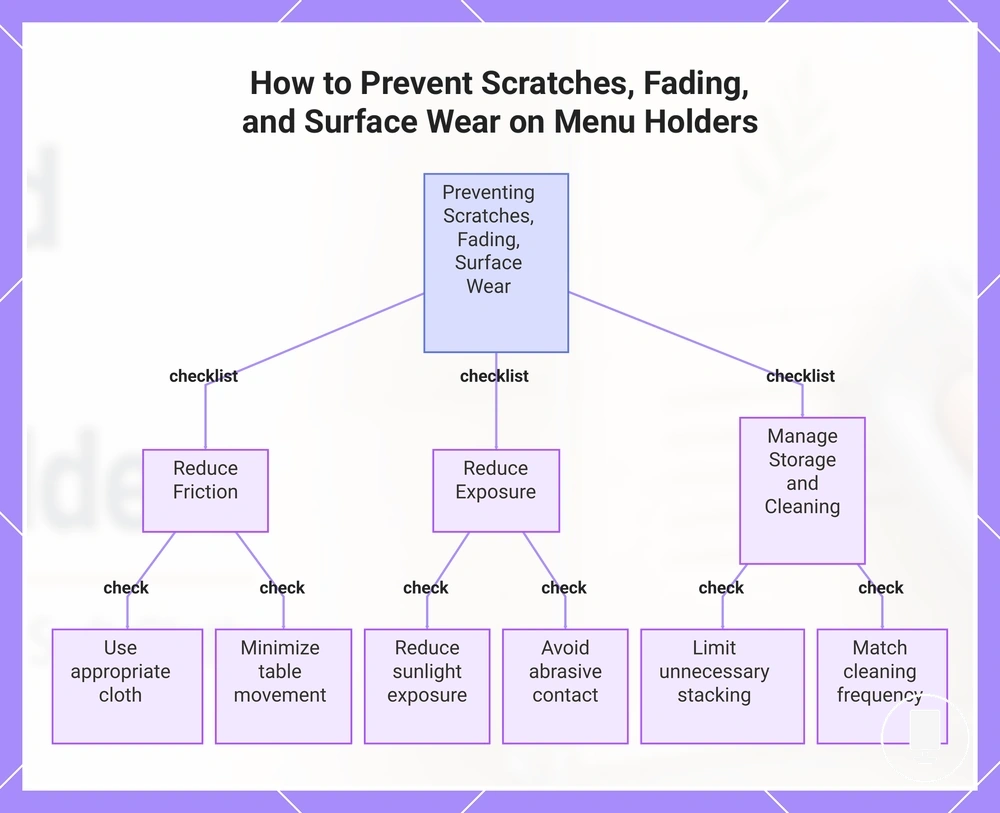
Scratches, fading, and surface wear often develop through repeated handling, environmental exposure, and daily use. Wear prevention focuses on reducing avoidable friction and limiting conditions that can affect long-term appearance. Friction, exposure, storage, and cleaning frequency are the main drivers of scratches, fading, and surface wear.
When menu holders are stacked frequently, moved across tables, exposed to sunlight, or handled repeatedly during insert changes, visible wear may become more likely over time. Surface protection depends on material quality, handling habits, exposure conditions, and use frequency, so wear reduction can vary by situation. Preventing Scratches, Fading, and Surface Wear is easier when friction, exposure, and handling risks are managed through the checklist below.
- Use an appropriate cloth choice to help reduce scratches caused by abrasive contact during cleaning and handling.
- Limit unnecessary stacking when pressure and movement between holders may increase scuffing and surface wear.
- Reduce prolonged sunlight exposure when fading or discoloration is a concern.
- Avoid abrasive contact with rough surfaces that can increase scratch risk.
- Minimize repeated table movement that may contribute to wear at contact points.
- Use careful insert handling to help reduce edge wear around pockets and presentation areas.
- Match cleaning frequency to usage conditions so residue buildup is less likely to require aggressive cleaning.
If scratches, fading, or surface wear are already visible, review common menu holder problems to determine whether diagnosis is more appropriate than prevention alone.
This chart shows the key prevention categories and checklist actions to reduce scratches, fading, and surface wear on menu holders.
Maintaining Menu Inserts During Cleaning
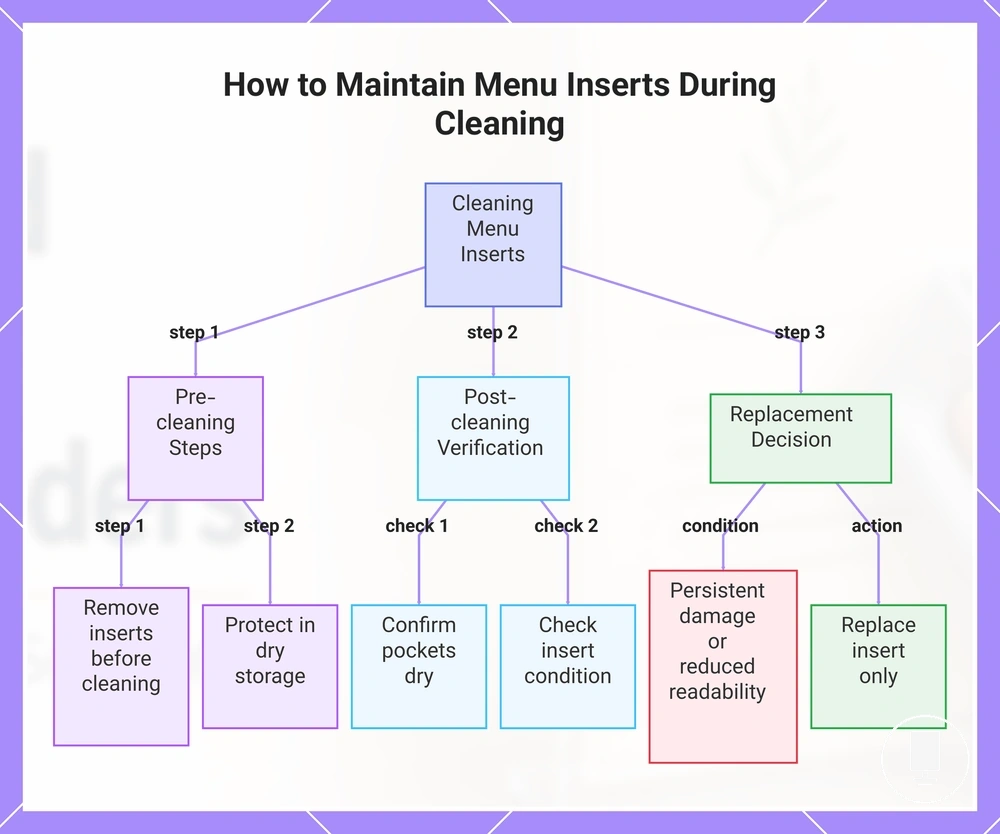
Menu inserts should be removed, protected, dried, and reinserted carefully so cleaning does not damage printed menus or trap moisture inside pockets. Moisture exposure can affect readability, pocket fit, and the condition of printed menus, especially when inserts remain in place during cleaning. Inserts should be protected before holder surfaces are cleaned.
When menu inserts are exposed to moisture, residue transfer, or trapped dampness, paper and laminate surfaces may show wrinkling, edge curling, or reduced readability. A careful cleaning sequence helps protect printed menus by separating insert care from holder cleaning and by confirming that pockets are dry before reuse. Maintaining Menu Inserts During Cleaning uses the checklist below to verify insert protection before reuse.
- Remove menu inserts before cleaning begins.
- Protect printed menus in a dry storage area while the holder is being cleaned.
- Confirm that pockets and the sleeve area are dry before reinserting insert sheets.
- Check insert paper and laminate surfaces for edge curling, wrinkling, or moisture-related changes.
- Reinsert menu pages only after pocket fit can be checked without trapped moisture.
- Use replacement condition as a signal when a printed insert shows persistent damage, reduced readability, or ongoing edge curling.
If the holder remains structurally usable but a printed insert no longer performs well, replacing only the insert may be more appropriate than replacing the entire holder.
This chart outlines the key steps to protect menu inserts during cleaning, from removal and storage to verification and replacement decisions.
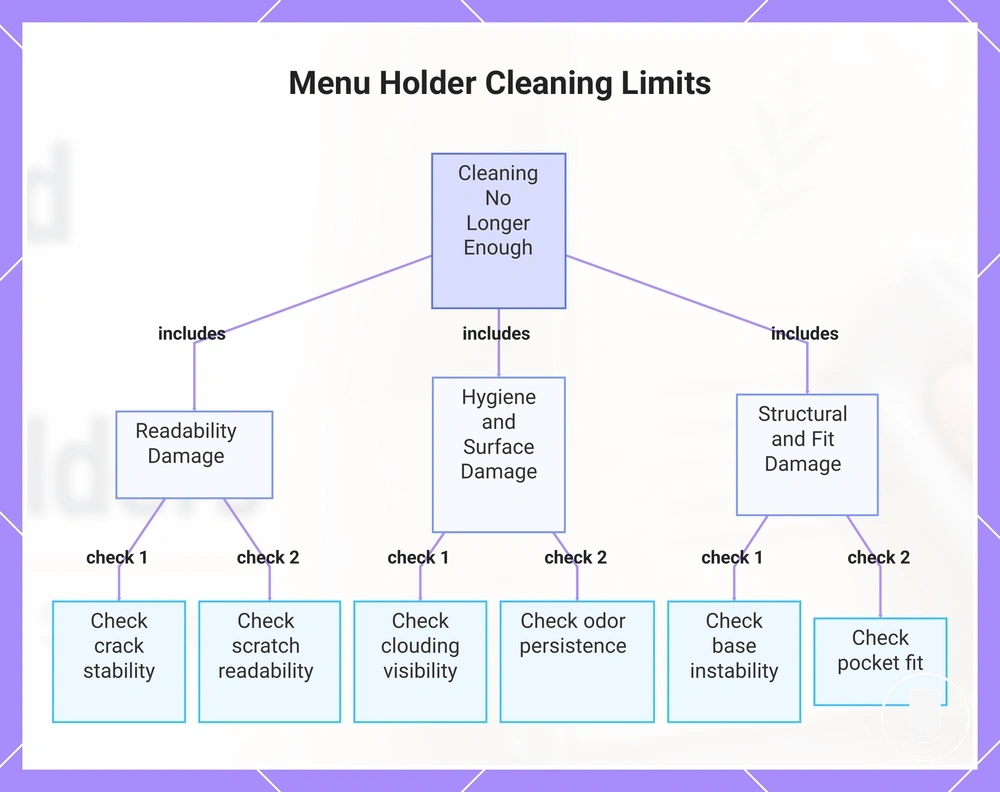
When Cleaning Is No Longer Enough
Cleaning is no longer enough when damage affects readability, hygiene, stability, insert fit, or professional presentation. At that point, cleaning limits become more important than additional cleaning effort. Cracks, deep scratches, clouding, peeling, warped pockets, persistent odor, unstable bases, and worn inserts are the main stop-signals for cleaning.
When Cleaning Is No Longer Enough, the correct next step depends on the type of damage and how strongly it affects daily use. Minor wear signals may allow continued use, while damage signs that affect readability, hygiene, stability, or insert fit may require repair assessment or replacement evaluation. Use the diagnostic checklist below to identify damage signs that cleaning cannot reliably resolve.
- Cracks: Check whether cracks affect stability or create a replacement cue for continued safe use assessment.
- Deep scratches: Check whether deep scratches reduce readability or weaken presentation after cleaning.
- Clouding: Check whether clouding limits menu visibility and remains despite cleaning attempts.
- Peeling: Check whether peeling creates surface wear, hygiene concerns, or moisture-related problems.
- Warped pockets: Check whether warped pockets affect insert fit or prevent printed menus from sitting correctly.
- Persistent odor: Check whether odor remains after cleaning and indicates a cleaning limit that needs further assessment.
- Unstable bases: Check whether instability affects placement, handling, or day-to-day use.
- Worn inserts: Check whether worn inserts reduce readability even when the holder condition remains usable.
For a detailed replacement evaluation, see when to replace worn menu holders. This section identifies replacement cues, while the detailed replacement checklist belongs on that page.
This chart shows the main damage categories that indicate cleaning is no longer sufficient and the specific checks to assess each type.